Interested in trying it out? Here's how I did it:
Supplies needed:
- Pumpkin (with top removed and the insides cleaned out)
- Metal cookie cutter
- block of wood
- hammer
- knife (I recommend a pairing knife)
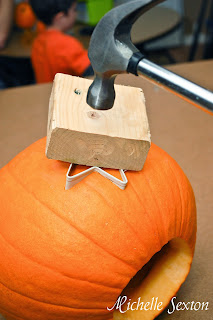
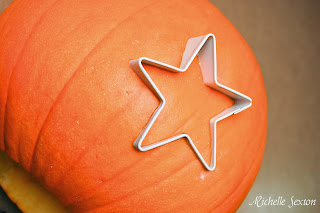
Place cookie cutter on top of the pumpkin, and the block of wood over the cookie cutter. Using the hammer, pound on the wood block until the cookie cutter has been pressed about half way down into the wall of the pumpkin. (Since pumpkins are round, it won't be able to be pressed in flush.) Be sure to leave about 1/8 of an inch of the cookie cutter sticking out.
Pull the cookie cutter out. You'll probably have to wiggle it out.
Finish cutting through the wall of the pumpkin using a knife by following the outline made from the cookie cutter. Once the cookie cutter shape has been cut all the way through, push the shape out, pushing from the inside to the outside. Repeat this process as much as you like around the rest of the pumpkin.
By the way, if you cut too many shapes into the pumpkin, it will end up weakening your pumpkin, which may result in the pumpkin breaking apart. I would recommend leaving a minimum of 2 inches between each cutout. Keep an eye on the pumpkin as each shape is cut and watch for cracks on the opposite side.
By the way, as I was working on my star shaped pumpkin, my husband and Mac were working on a Mac's pumpkin. After searching through numerous photos of pumpkin carvings online, Mac was absolutely certain that he wanted a Mickey Mouse pumpkin. My husband was less than thrilled. Lots of cutting. (super amusing to watch though.) But just in case you interested in trying Mickey Mouse, you can find the template here.
Have you guys decorated your pumpkins yet? How did you decorate them?
Liked the post? Let me notify you of new posts. Don't worry, I hate SPAM and won't abuse your email address. :)


8 comments:
Great idea! I love the star pumpkin, very cute!
I always want to try this! maybe this year, since we haven't carved any yet.
What an amazing idea! I would have never come up with this on my own! Saw this at Live Laugh Linky Thursday! Don't you just love link up parties? I am having my first one ever tomorrow called Family Fridays! :/ I am a bit nervous! Maybe you can stop by and share a few links? I hope so! I will be pinning this right now! www.livinthemomlife.com
What a great idea! I don't actually carve pumpkins myself, but this is how I would do it if I was going to. I just pinned it to my Holiday board...maybe need to add it to a round up too.
Thanks!
Found you from Fancy This Fridays link party.
HOW fun!! My boys would love banging with the hammer much more that then would even like carving. Thanks for linking up to tasteful Tuesdays... YOU are featured today... head over and check it out... I've shared your feature on all my favorite social media and I would love for you to as well!!! thanks! EMily@nap-timecreations
Thank you for stopping by The Project Stash this week! Like this project! ~Melanie @ It Happens in a Blink
So cute. I would have never thought you could use a cookie cutter.
Great idea!!! Pinned:) Happy Halloween!
Post a Comment