
Have you guys missed me? Please say yes. I'm going to pretend that you did. ;) Let me just tell you that this past month has truly been a JOURNEY. I am still recovering from this whole ridiculous sleep loss thing in so many ways. There has been a lot that we have discovered along the way:
- I have Sleep Hypopnea - it's like Apnea, but you don't stop breathing for as long. I had to get one of those PAP machines with the mask that you wear to sleep with pressurized air. It's helped a lot, but I'm still getting used to sleeping with it.
- Ambien is a BAD drug, and although it works for some people, it doesn't for everyone. I am one of those people. I did not have good results taking it. The more I talk to people about taking Ambien, the more crazy stories I hear from others who have taken it. Do you have a story about the strange effects of taking Ambien? Please, do share. ;) I am still recovering from taking that sleep aid over two weeks ago. Not my favorite moments.
- We've also learned that I have very low Vitamin D levels. I've actually had to get a prescription for Vitamin D to boost my levels. Pretty sure that the low levels had a lot to do with all these health issues I've had.
- Just as I was starting to feel better, my older son shared a nice stomach virus with me. I've spent most of the day on the couch. Bleh.
Crazy times, people. Crazy times. God has taught me a lot during this time, and has brought so many verses to my mind, as I work through all these challenges. Here's one that the Lord has continually reminded me of:
But he said to me, "My grace is sufficient for you, for my power is made perfect in weakness."Therefore I will boast all the more gladly about my weaknesses, so that Christ's power may rest on me. That is why, for Christ's sake, I delight in weaknesses, in insults, in hardships, in persecutions, in difficulties. For when I am weak, then I am strong." 2 Corinthians 12:9-10
I don't yet feel well enough to write again, but when I do, I will be back. If you think about me, I would appreciate your prayers for healing. :)


Thursday, May 29, 2014
Tuesday, May 6, 2014
I'm still here!
Hey everyone! I'm still here. This last week has been so insane and unexpected! Last week I managed to go several days without sleeping. It was horrible. You should never do that...not that I did that on purpose. It's a long story, but basically due to a continuous cycle of extreme sleep deprivation, due to sickness, I basically BROKE my sleep! I didn't even know it was possible to do something like this. I just reached the point where my body was no longer able to fall asleep. So after several days without sleep, I ended up in the emergency room, and then later doing a sleep study. Can I just tell you I HATE going to the ER? It takes so long (even on a slow night) and it's SO expensive! So after all that, it seems as though I have sleep apnea and probably rhinitis (sinus swelling) - still waiting for the official diagnosis. I'm currently recovering from all the sleep deprivation and we are exploring sleep options for the apnea issue with the doctor at the sleep clinic. Anyway, this whole experience has taken a beating on my body - physically, emotionally, and spiritually. Through this experience God has taught me a lot and his provision has been amazing. All that to say that I'm ok! I just need a little bit of time to recover and return back to normal. (I'm currently suffering from extreme spaciness. Yesterday I put dinner in the crock pot at noon and then forgot to turn it on multiple times. Finally remembered around 8pm. Dinner fail. We had take out instead.) So once my brain and my body can function on a normal level, I will be back to show you the awesome stuff I've made! Soon friends, soon. :)
Friday, May 2, 2014
Sorry for the absence.
I'm taking the week off. I haven't been feeling well this week due to an extreme lack of sleep (and an extreme lack of sleep also inhibits your productivity). I will probably be doing a sleep study within the next couple of days, but possibly even tonight. It's been a bit of a rough patch for me, but I'm working through it. I have tons of stuff planned to share with you guys, but I just need a couple of days to recover from these crazy sleep issues. :)
Thursday, April 24, 2014
Sidewalk Chalk Paint & Plastic Easter Egg Play
Do you still have a multitude of leftover plastic Easter eggs? We do over here, too. Earlier this week, I shared 15 ways to reuse plastic Easter Eggs. You should definitely check it out. We are still coming up with new ways to reuse all of these eggs. A couple of days ago, we spent a good hour painting on the sidewalk with plastic Easter eggs and sidewalk chalk paint. (BTW, I have the Sidewalk Chalk Paint Recipe, too!) The boys had a blast. Here's how it went down:


You will need:
- 2 cups of water
- 2 cups of cornstarch
- empty squirt bottles (like dish soap bottles)
- food color
- plastic Easter eggs


How to make the Sidewalk Chalk Paint:
Add the cornstarch into the water, in small increments, whisking as you add the cornstarch, until thoroughly combined. It should produce approximately 3 cups of sidewalk chalk paint. Add equal amounts of the cornstarch mixture to each squirt bottle and add about 5 drops of food color (or more if you like) and shake each bottle to combine the paint.
There are so many ways to play with the sidewalk chalk pain and plastic Easter eggs:
- Pour the paint into the eggs and drizzle it out
- Crack the paint filled eggs open onto the cement
- Shake paint filled eggs (with the holes) to drip onto the cement
- use the egg shell halves to stamp with paint or to create impressions into partially dried paint
- lay the shells down and paint over the top of the shells
- use a paint brush (or basting brush) to paint directly onto the cement.


You will need:
- 2 cups of water
- 2 cups of cornstarch
- empty squirt bottles (like dish soap bottles)
- food color
- plastic Easter eggs
How to make the Sidewalk Chalk Paint:
Add the cornstarch into the water, in small increments, whisking as you add the cornstarch, until thoroughly combined. It should produce approximately 3 cups of sidewalk chalk paint. Add equal amounts of the cornstarch mixture to each squirt bottle and add about 5 drops of food color (or more if you like) and shake each bottle to combine the paint.
There are so many ways to play with the sidewalk chalk pain and plastic Easter eggs:
- Pour the paint into the eggs and drizzle it out
- Crack the paint filled eggs open onto the cement
- Shake paint filled eggs (with the holes) to drip onto the cement
- use the egg shell halves to stamp with paint or to create impressions into partially dried paint
- lay the shells down and paint over the top of the shells
- use a paint brush (or basting brush) to paint directly onto the cement.
Mac enjoyed pouring the paint inside the Easter Eggs
Mixing the paint colors was a fun experiment
Pouring the paint from the eggs onto the concrete.
Cheese scraped the paint with the plastic egg shells.
Cheese's favorite activity was pouring the paint directly onto the concrete. (Typical toddler)
At this point, Cheese claimed ownership over the bottle of green paint, and became angry when he was forced to share with his brother. So, to protest, he decided to lay face-down on the painted concrete. Oh, toddlers. ;)
This was the result of his protest. The funny thing was that it never seemed to bother him to have wet chalk paint on his face. He was crying because he was angry.
Scraping patterns into the paint.
Super easy, potentially messy (completely washable), but plenty of fun.
Tuesday, April 22, 2014
15 Ways To Reuse Plastic Easter Eggs
So I have a question for you guys. Has your house been overrun with plastic Easter Eggs yet? Do you found random separated shells all over the living room floor? Have you stepped on any plastic shells? Have you found them in the toys boxes? Yes? No? Not yet? Yeah, if it hasn't happened to your house yet, you know it will in about a week. Maybe your kids still have their candy stashed inside those colorful little eggs still inside their Easter baskets. However, once that beloved candy has been consumed, I assure you those pretty colorful plastic eggs will begin to travel around the house. What to do? Well, you can always recycle them OR you can upcycle and reuse the plastic Easter Eggs. Here are 15 ways to reuse plastic Easter Eggs.

.JPG)


Painting with Plastic Easter Eggs - from Learn Play Imagine
Egg Sculpture - from Fun-A-Day
Plastic Egg Snake - from Sewing Crafting Sarah
Light Up Fireflies - from Apartment Therapy
Snack Containers - from Real Simple
Egg Peeps - from Mom on Timeout
Easter Egg Yarn Bumble Bee - from The Inadvertant Farmer
Easter Egg Rings - from Dollar Store Crafts
Easter Egg Popsicles - from Kailo Chic
Homemade Play-doh Storage - from Olds Ninety-Eight
Memory Game - from Happily Ever Mom
Plastic Egg Maracas - from Ramblings From Utopia
Easter Egg Math - from The Happy Teacher
Plastic Easter Egg Teacups - from Design Dazzle
Easter Bunnies - from Crafts Unleashed
Which one is your favorite? What is your favorite way to reuse plastic Easter eggs?
Thursday, April 17, 2014
Printable Monster Lacing Cards
Does anybody have summer on the brain yet? Or are you still thinking about Spring? If you are, I don't blame you...didn't Spring just get here last week?? ;) Over the past couple of days, I've been thinking more and more about the summer. Do you have plans for summer yet? We do. Part of that plan involves taking two kids on a plane. In my mind I'm already thinking ahead and planning the activities I can bring for my boys during the plane ride. I think before our trip I'm going to go on a massive printable paper toy hunt to gather as many as I can. I am definitely going to bring along these printable monster lacing cards that I made. Lacing cards are a great way for toddlers and preschoolers to work on developing fine motor skills, but I've rarely seen them outside of a daycare or preschool. So let's make our own! But we should make monster lacing cards. Ready? Let's do it!


You will need:
- These Printable Monster Lacing Cards
- thin piece of cardboard (like the kind on the back of a spiral notebook)
- shoe lace, yarn or string with stiff ends for threading
- spray adhesive or glue of some sort
- 1/8" hole punch (not pictured)
- scissors

Make them:
Adhere the Monster Printable to the cardboard with spray adhesive or glue.

Cut out the monsters.
Use the hole punch to press out each black circle on the monster.

Encourage your child to thread the shoe lace in and out of the holes in any way they see fit.
Enjoy!
You will need:
- These Printable Monster Lacing Cards
- thin piece of cardboard (like the kind on the back of a spiral notebook)
- shoe lace, yarn or string with stiff ends for threading
- spray adhesive or glue of some sort
- 1/8" hole punch (not pictured)
- scissors
Make them:
Adhere the Monster Printable to the cardboard with spray adhesive or glue.
Cut out the monsters.
Use the hole punch to press out each black circle on the monster.
Encourage your child to thread the shoe lace in and out of the holes in any way they see fit.
Enjoy!
Wednesday, April 16, 2014
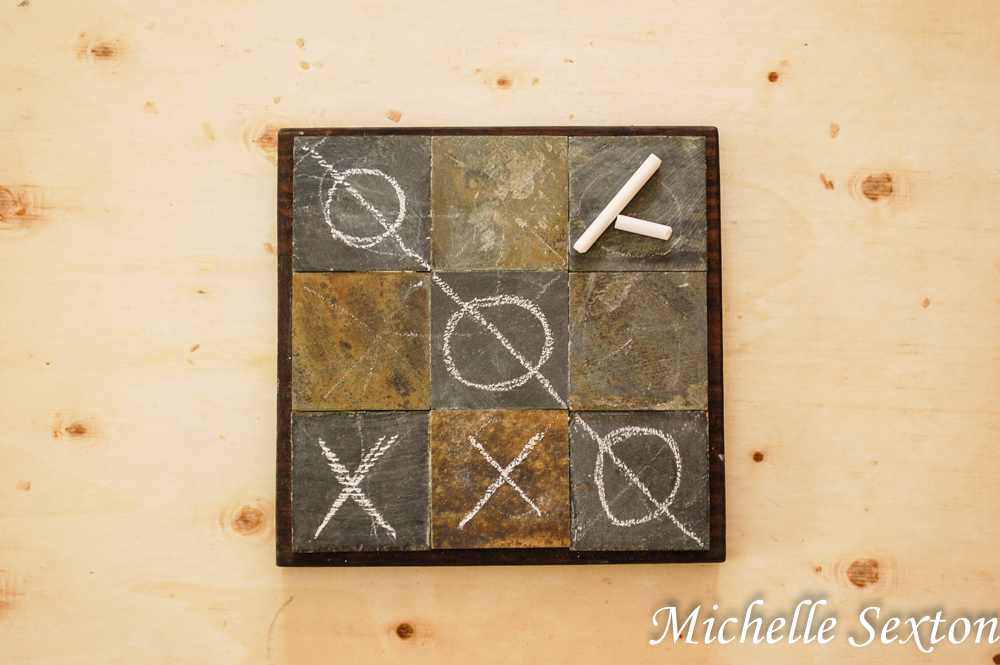
DIY Coffee Table Tic Tac Toe Board
Ready to make something for your home? Yes? Good. A couple weeks ago, I mentioned that we went Geocaching in this post. While we were driving through the desert near our house, we spotted a pile of discarded slate tiles. (Yeah, people dump their junk in the desert sometimes. Beyond aggravating.) So we stopped, I sifted through them, and brought several of them home for a project - A Tic Tac Toe Board to be exact. Not just any old Tic Tac Toe board, but a Coffee Table Tic Tac Toe Board. So much fun, right? Why didn't we think to do this sooner??

Here's what you need:
- 9 slate tiles 3 1/2 x 3 1/2 inches
- 11 1/2 x 11 1/2 x 1 1/2 board (we used a 2x12x8 ft board. planks are always 1/2 inch smaller than advertised)
- liquid nails (we used Loctite Pro Line)
- dark walnut wood stain
- sand paper
- 1 sheet of adhesive vinyl
- white acrylic paint
- craft sponge brush
- this Silhouette file (optional)

Here's how to make this Tic Tac Toe Board:

Use the sandpaper to smooth down all the corners, and any rough spots.

Seal the wood using the wood stain. Be sure to follow the directions on the wood stain and allow for the proper drying time.

Use the Silhoutte to cut out this file onto adhesive vinyl to create a stencil. (If you don't have a Silhoutte, then skip this step or decorate the sides in your own way.)


Place each stencil on the sides of the board. Paint each side using the craft sponge brush. Gently peel the stencil off the wood.


Once the paint has dried, arrange the tiles until you are satisfied. Glue one tile on at a time, making sure to place each tile in the exact position as previously arranged. Allow to dry over night before use.


That's it. It's definitely not a difficult project, but you do you have to allow drying time...always a little challenging for us impatient people! ;) Totally worth the wait, though.
Enjoy!
- 9 slate tiles 3 1/2 x 3 1/2 inches
- 11 1/2 x 11 1/2 x 1 1/2 board (we used a 2x12x8 ft board. planks are always 1/2 inch smaller than advertised)
- liquid nails (we used Loctite Pro Line)
- dark walnut wood stain
- sand paper
- 1 sheet of adhesive vinyl
- white acrylic paint
- craft sponge brush
- this Silhouette file (optional)
Here's how to make this Tic Tac Toe Board:
Use the sandpaper to smooth down all the corners, and any rough spots.
Seal the wood using the wood stain. Be sure to follow the directions on the wood stain and allow for the proper drying time.
Use the Silhoutte to cut out this file onto adhesive vinyl to create a stencil. (If you don't have a Silhoutte, then skip this step or decorate the sides in your own way.)
Place each stencil on the sides of the board. Paint each side using the craft sponge brush. Gently peel the stencil off the wood.
Once the paint has dried, arrange the tiles until you are satisfied. Glue one tile on at a time, making sure to place each tile in the exact position as previously arranged. Allow to dry over night before use.
Enjoy!
Subscribe to:
Posts (Atom)