So Here's My Life

The things we make,
the food we eat and
the shenanigans in between.

A blog about making things by
MICHELLE SEXTON

Showing posts with label Halloween. Show all posts

Tuesday, October 29, 2013

11 Easy to Make Halloween Costumes for Kids made from Duct Tape

This weekend I had a realization - Halloween is less than a week away. Nooooooo! This realization gave way to feelings of dread. I am not ready for Halloween. I only have one costume for one child. At this point I'm not willing to take the time to work on a cute but time consuming Halloween costume project. Are you with me? So here are 11 kid's Halloween costumes for all of us parents who have procrastinated in the costume department. But wait...they are also made from Duct Tape - So much easier, right?

Duct Tape Super Hero Costume
The Super-Hero 

Stick figure costume made with Duct Tape
The Stick Figure 

Skeleton Costume made with Duct Tape

pizza slice costume made with Duct Tape

Zebra and Lion Costumes Made from Duct Tape

Candy Corn costume made from Duct Tape

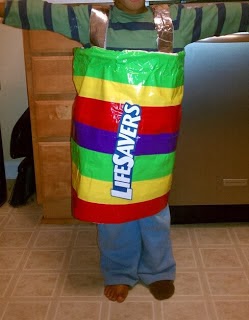
Duct Tape Life Savers Costume
The Roll of Life Savers

Charlie Brown Duct Tape Costume

Bacon and Egg costume made with Duct Tape

Watermelon slice costume made from Duct Tape
The Watermelon Slice

Bird Costume Made from Duct Tape

See, now you have some options. It's ok procrastinating parents - go get some Duct Tape. Feel better? ;)

P.S. I think I am going to do the Stick Man. Because Cheese is too little to have much of an opinion on what he wears...and it's quick and easy. Ha!

Tuesday, October 22, 2013

Simple Pumpkin Carving Using Cookie Cutters

Pumpkin Season has definitely arrived. Rejoice friends! Let's carve a pumpkin or two to celebrate. This year, instead of hacking away at the pumpkin with a knife, I decided to try something a little more simple - cookie cutters. What? For real. I used a cute 1 inch tall star-shaped metal cookie cutter to make nice, uniform shapes around my pumpkin. So fun and pretty easy. Plus, it's a great way to get your kids involved in the pumpkin carving process, as opposed to the alternative - carving away as your child watches you (because you don't trust them with a knife).


star pumpkin with small pumpkins

Interested in trying it out? Here's how I did it:

pumpkin carving supplies

Supplies needed:
- Pumpkin (with top removed and the insides cleaned out)
- Metal cookie cutter
- block of wood
- hammer
- knife (I recommend a pairing knife)

Carving a pumpkin using a cookie cutter

Place cookie cutter on top of the pumpkin, and the block of wood over the cookie cutter. Using the hammer, pound on the wood block until the cookie cutter has been pressed about half way down into the wall of the pumpkin. (Since pumpkins are round, it won't be able to be pressed in flush.) Be sure to leave about 1/8 of an inch of the cookie cutter sticking out.

star cookie cutter pressed into pumpkin
Pull the cookie cutter out. You'll probably have to wiggle it out.

Knife cutting pumpkin
Finish cutting through the wall of the pumpkin using a knife by following the outline made from the cookie cutter. Once the cookie cutter shape has been cut all the way through, push the shape out, pushing from the inside to the outside. Repeat this process as much as you like around the rest of the pumpkin.

 star carved pumpkin
By the way, if you cut too many shapes into the pumpkin, it will end up weakening your pumpkin, which may result in the pumpkin breaking apart. I would recommend leaving a minimum of 2 inches between each cutout. Keep an eye on the pumpkin as each shape is cut and watch for cracks on the opposite side.

Mickey Mouse Pumpkin
By the way, as I was working on my star shaped pumpkin, my husband and Mac were working on a Mac's pumpkin. After searching through numerous photos of pumpkin carvings online, Mac was absolutely certain that he wanted a Mickey Mouse pumpkin. My husband was less than thrilled. Lots of cutting. (super amusing to watch though.) But just in case you interested in trying Mickey Mouse, you can find the template here.

Star pumpkin and Mickey Mouse Pumpkin
Have you guys decorated your pumpkins yet? How did you decorate them?

Liked the post? Let me notify you of new posts. Don't worry, I hate SPAM and won't abuse your email address. :)


nap-time creations
 photo partybutton1_zpsaf59da8f.png

Thursday, October 10, 2013

Eyeball Candle Holder Jars

I'm not a huge fan of Halloween. I don't like creepy things, but Mac has 3 Halloween shirts. And we made this eyeball jar the other day. So, maybe I am contradicting myself? Perhaps.

Eyeball Jars on display from a preschool project

A couple of days ago, Mac and I made eyeball candle holder jars. They were pretty fun. Other than getting his fingers sticky, he loved making them. It's a quick and easy project for a four-year old. And it uses lots of eyeballs. How cool is that?

After Mac finished his eyeball jar, he proudly carried it around the house for the next couple of days (without a candle, of course). He was disappointed when I told him he couldn't drink out of it. He also repeatedly showed his younger brother, "Look! An eyeball jar!" Cheese had no idea what he was looking at. Mac was even planning on taking it to school for Show 'N Tell, but changed his mind at the last minute.

Anyway, this was fun for the both of us to do. And here's how we did it:

Supplies needed:
- jar
- orange tissue paper
- Mod Podge
- sponge brush
- a package of wiggle eyes

tissue paper crumpling by a preschooler
Start by crumpling your tissue paper to give a wrinkled look.

preschooler tearing tissue paper
Tear the tissue paper into strips. Ours were about 6 inches long and 1 inch wide.

preschooler painting glue
Using the sponge brush and the Mod Podge, cover approximately 1/4 of the jar.

preschool child adding tissue paper
Press the tissue paper strips on top of the wet Mod Podge. Continue painting Mod Podge in sections and covering with tissue paper until the entire jar is covered.

child adding glue
Once the jar is covered, do a second coat of Mod Podge, and cover with an additional layer of tissue paper. Continue with the second coat until the entire jar is covered.

child adding eyes to a jar
Paint a section of the jar with Mod Podge, and stick on the wiggle eyes however your heart desires.

preschool boy admiring craft
Once you have finished sticking on the eyes, allow to dry for about 10 minutes or so. (It doesn't need to be completely dry). Paint one more coat of Mod Podge over the entire jar including the eyes. Be sure to paint in the crevices between the eyes to keep them from falling off after it dries. Allow it to dry for several hours.

Eyeball jars with candles
 A couple of tips:
-When painting over the eyes, make sure to use long brush strokes instead of blotting on the Mod Podge. Blotting creates tiny bubbles that will dry in the Mod Podge, which create a whitish film over the eyes.
-Instead of tearing strips of tissue paper, consider tearing tissue paper into 1 inch squares. This will probably be a little easier to arrange on the jar. I didn't think about this until after we finished.

glowing eyeball jars for Halloween


Keeping It Simple


nap-time creations

Tuesday, November 1, 2011

Halloween Festivities

Do you want to know what I've been up to over the past several days? Lots! We've visited a pumpkin patch, Dressed up the toddler for various Halloween Events, taken him Trick or Treating and I even sprained my ankle! That's right, I sprained my ankle. Boo!

On Friday, we went with our mom's group to visit a pumpkin patch. Innocent enough, right??

There was a petting zoo with a cute little pony who adored the kids and stood next to the fence so all the little ones could pet him.

And we went on a hayride, where I forced my son to take a picture with me. See how happy he is to get his picture taken? (p.s. I'm wearing my mom's shirt from the 70's. My dad bought it for her when they were engaged. vintage. yes)

And The Toddler was allowed to pick out his very own pumpkin. This is the one he chose. He carries it around the house too, because he is so proud of it.

But there was this one slide at the pumpkin patch. This is the top of the slide in the picture - that big black tube. It was a bad slide. I went down it with my son and his friend. The slide was steep, and I was holding 50+ pounds of extra weight going down the slide. I couldn't slow myself down in time. So I slammed into the ground at the bottom. But I didn't drop the 2 toddlers. Just so you know. My ankle twisted outward really far. Fortunately I was wearing my cowboy boots (love those) and they have extra support around the ankles. I'm confident that if it wasn't for my boots, my ankle would be broken. It took me a couple of minutes before I could stand up. We did a couple more activities at the pumpkin patch before the pain began to really set in and we had to go home.

And now I get to wear this. Isn't that great? Not so much. Pretty certain it's a sprain and not a break - just by the way it feels. (I've had breaks and sprains before). I haven't gone to the doctor, but mostly because I'm pretty certain it's only a sprain - but there is definitely no walking on it. So the boot is my next best option. And this is how I spent the next several days - when we weren't doing other fun things.

We also went to the Zoo Boo and the Toddler chose to dress like Superman. See how excited he is to take a picture here too? I tried to convince him to wear his cute monkey costume, but he wasn't interested. Whatever. We stayed at the zoo until it became unbelievable crowded and my ankle started to ache, and I felt the need to mow people down for not moving out of the way for a lady with a gimpy leg. (aka me)

My parents also came to into town to visit us. My mom and I checked out a couple of antique shops. Because we like that sort thing - even if we don't buy anything. It's always fun to look at the unique stuff. Here are a couple of things I liked and a couple of things I found amusing.

Check out this scooter! How awesome is this???

This circley wire thing is a vintage flower holder. This would be an awesome DIY project.

I'm not so sure I understand the outfit on his manikin...hmm....

Halloween costume anyone? Nice.

So to end it all, we dressed up the Toddler in his awesome monkey costume took him trick or treating to a couple of neighbor's houses, and then took him to a Trunk or Treat at our church.

I forgot to take more pictures of his cute costume. I was busy having a sprained ankle. Ha.

We had lots of fun over the past several days (except for the sprained ankle part. That wasn't very fun), but I am glad the festivities are over. Now, onto Thanksgiving. :)