Headbands are pretty much the most useful accessory for moms. You can
wear one just for fun, but they are also great for those days when you
have to run out of the house without a shower. (I hate those days) Since
you have on such a cute headband, no one will even notice that your
hair is unwashed!
In my previous blog post, I talked about a blogger's gift exchange I participated in. If you clicked over to Megan's page, the blogger I got matched up with, you saw that I made her a headband. I made this headband from a T-shirt sleeve, and took less than an hour. Here's how I did it:
I found this t-shirt at a flea market in the fall. A vendor was selling a bunch of t-shirts for $1 each. So I snagged an XXL sized one, with the intention to use it for an undetermined future project.
Start by cutting off the sleeve of the T-shirt.
Determine the desired width of the headband, and trim off the excess fabric. But keep in mind that you want to leave a little extra for sewing and hemming the raw side. I wanted mine to be about an inch wide, so I gave myself an additional inch of fabric to work with.
Next, serge the raw edge of the T-shirt. (Actually in retrospect, you can probably skip this step, because t-shirt material typically doesn't unravel...didn't think about that until now. Duh)
Next turn the sleeve inside out, fold over the trimmed side, pin it, and sew it.
Then, to hide the unfinished edge, while the sleeve is still inside out, fold over the sewn edge, pin it, and sew it one more time to give it a more finished look.
Your headband should look something like the one pictured above. Then stitch a decorative line down the opposite side of the headband (The side that you didn't sew yet).
Once you have finished, add some cute accessories, like buttons. (it just so happens that I LOVE buttons. It's my secret obsession) I hand stitched these on, but if you are feeling super lazy, you could always use hot glue!
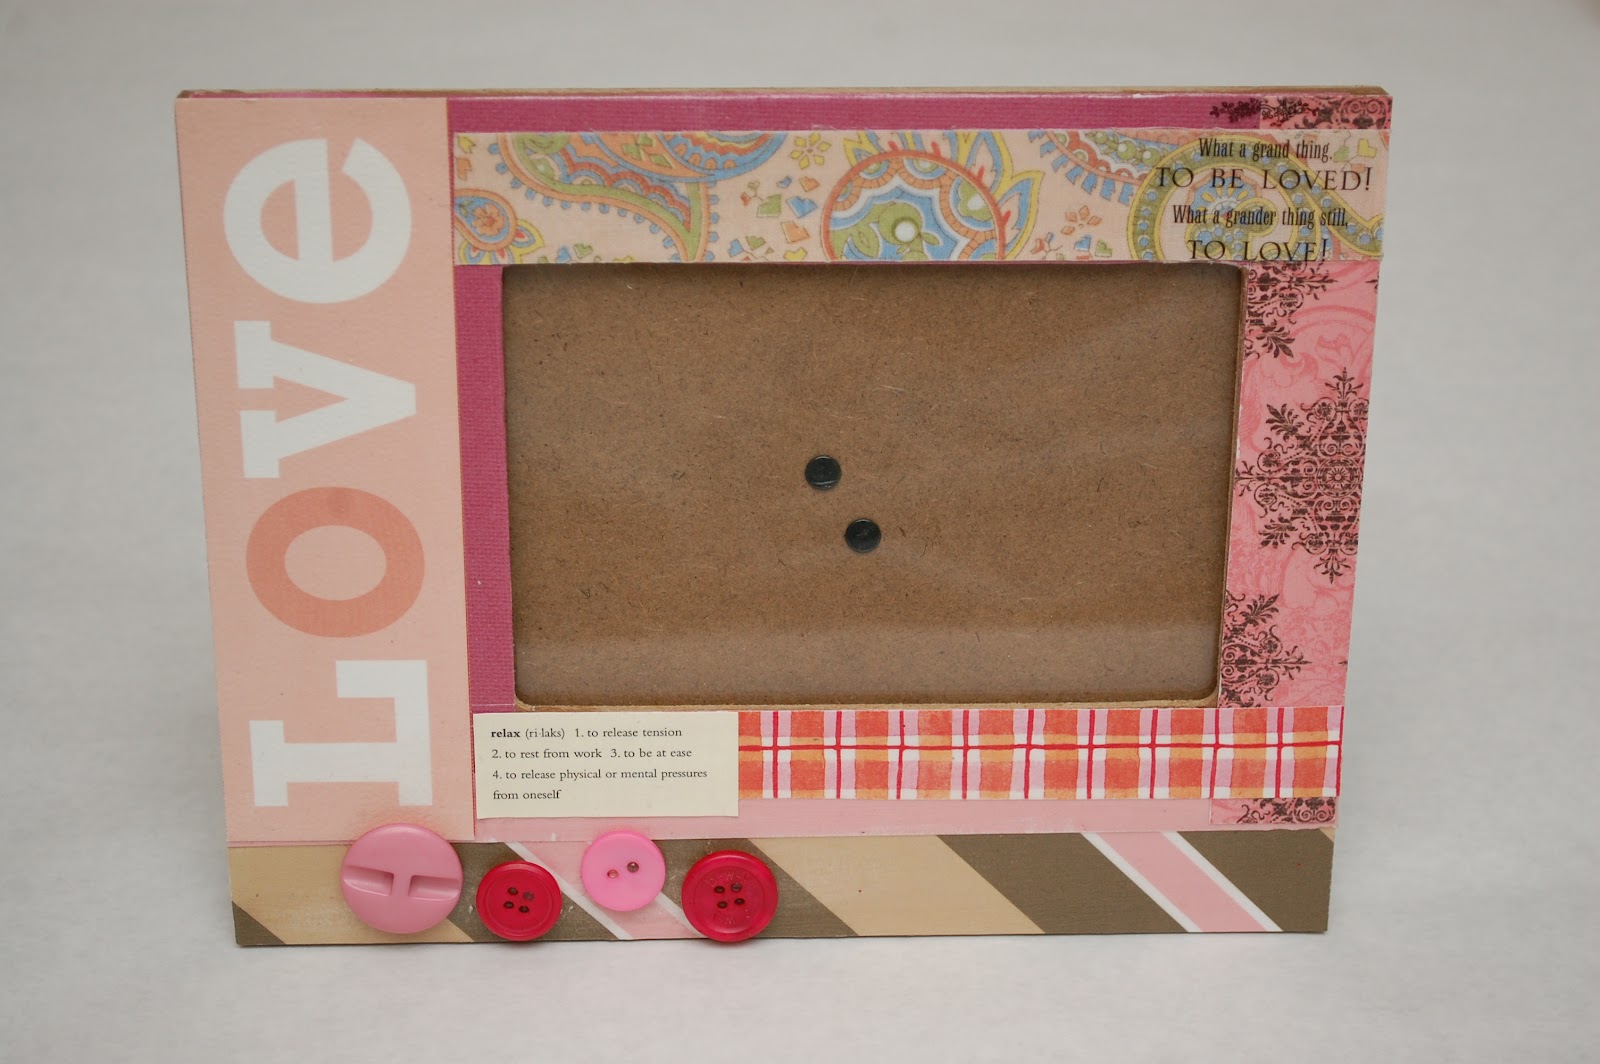
Last month I signed up to be a part of a blogger's gift exchange hosted by bloggers, Casey, Danielle, and Alycia. The catch about the gift exchange was that you had to make a gift within a $20 limit. I got matched up with Megan.
Megan has been such a fun person to get to know, and I love the fact that she is a young mom, just like me...as long as I still get to fit into that category. The more I get to know her, the more I am amazed at the fact that we have so much in common. She has an intriguing blog about her life, struggles, and issues to think about. It's definitely worth checking out.
So anyway, the deadline for the exchange was January 31st. But both of us are serious procrastinators (and completely consumed with plenty of other distractions), so meeting that deadlines didn't exactly happen, in fact, we didn't even send our gifts out until last week! Ha. And now we are finally getting around to blogging about the gift exchange. Yes, I know. We are both really awesome like that.
Here's what I got from Megan:
A super cute picture frame that she decorated! Now I need to figure out what picture to put in there. Hmmm...
And a fun necklace made by her sister.
Isn't it cute? I think so. She makes jewelry and sells them on her Etsy called Rhi's Designs. Definitely make it a point to check out her goods. My personal favorite is the Queen Bee Necklace.
The blogger gift exchange was such a fun idea and a great way to make a new friend. So if you come across the opportunity to join, definitely do it.
:)
My son is a picky eater. It drives me crazy. But he's been that way since birth, so I'm used to it. He frequently goes through stages where he refuses to eat certain things. Right now it's dinner. Obnoxious. Tomorrow morning we have an appointment with the feeding clinic to come up with new eating strategies. We've been in contact and/or working with them on and off since The Toddler was 4 months old.
We had a nice little battle at dinner time last night. Afterwards I thought to myself, "You know what? If the Toddler wants to skip dinner every night, then it's time to pull out The Big Guns."
What are the Big Guns? It's my Serious Business Strategy for keeping The Toddler well nourished. I hide vegetables and other nutritious things into the food he is actually willing to eat. Oh yes.
I've done this off and on over the past couple of years, but I usually taper off when he decides he wants to eat again.
This morning, I came up with a quick and easy way to enhance something he actually loves to eat - muffins.
I used Martha White muffin mix that you can find at any grocery store. You are only required to add milk. The package only make 6 muffins, so I used two packages to make a dozen.
Here's what I did:
After combining the milk to the muffin mix, I added a couple of awesome ingredients:
1 medium carrot (about 3/4 cup), peeled and finely grated.
2 tablespoons of Wheat Germ
Approximately 1/2 a cup of finely-chopped dried, mixed fruit (I used an electric chopper)
Then, I baked the muffins according to the package directions.
Super easy, and great results.
And look - The Toddler ate them and liked them. Here's proof:
He also requested another muffin for his afternoon snack. Victory.
And by the way - don't worry about us dealing with The Toddler's eating shenanigans. We are pretty familiar with what works and what doesn't with him at this point. We've found that with patience and creative thinking, we are always able to get him to eat again.
But if you are looking for a good resource for getting your child to eat, I would recommend the book, How to Get Your Kid to Eat, But Not Too Much by Ellyn Satter. And you can get it right here:
Today is the last part of the series, and it's also my favorite project out of all the sweater projects that I've done. Be sure to catch up if you haven't read Parts 1-4. Part 1 was a tutorial on leg warmers. Part 2 was about making mittens and a scarf. In Part 3 you can learn how to make arm warmers, and Part 4 you can learn to make an infinity scarf, and a sweater vest.
For the last project, I made skirts from mens sweaters...
I used the arms from both of the sweaters to make leg warmers in Part 1. To start out, cut apart the sweater's shoulders (after the arms have been cut off).
This sweater was a men's size large. I wanted to use the bottom of the sweater (the part that sits at the waist), as the waist for my skirt. However, as it was, it was too large to fit snugly around my waist (fortunately!). Start by measuring your waist or the place where you want the top of the skirt to fit. Subtract 3 inches from your waist measurement. Then, divide that number in half and use that number to mark off where to cut the waistline. For example: If my waist is 25 inches (it's not), then I subtract 3 and end up with 22 inches. From there I divide 22 in half and end up with 11. So that means I need to mark off a waistline that is only 11 inches long when the sweater is laying down (and trim off the excess fabric outside of the marked off waistline).
I used chalk to mark my sweater. Also, make sure that you turn the sweater inside out before marking, pinning, cutting, and sewing!
After marking off the waist on your skirt, use a yard stick or a straight surface to mark the outline of the sides for the skirt. (I don't have a yard stick, so I used a scrap board instead.)
My mom helped me. These are her hands, btw.
Then pin along the marked part of your fabric, cut about an inch outside the marked line, serge the ends, and then sew along the marked edges. (This is always a challenge for me. Seriously, I have the hardest time sewing in a straight line!) Repeat on the opposite side.
Almost done. After deciding on the length of the skirt, trim the bottom giving yourself about an inch or two to work with. Serge the bottom, fold up the fabric to where you would like the hem to be, pin it, and hem by hand (blah) to avoid stretching the fabric in weird places.
And now you have a skirt like this!
The slit in my skirt was where the bottom of the sweater's armpit started. You don't have to do it this way, I just wanted the skirt to be longer.
The next sweater wasn't as involved as the previous one because it was a smaller size (Medium)
This sweater fit my waist well as it was, there was no trimming and cutting along the sides or the waist. After I cut apart the shoulders, I measured the length I wanted my skirt, serged it, and hemmed it with my sewing machine. (This fabric wasn't as stretchy and textured as the previous sweater was, so it was relatively easy to hem with the machine, carefully.)
I also added slits to this skirt as well (to get more length). But, I hemmed the slits by hand after I serged the fabric, because I didn't think I could hem without stretching the fabric while maneuvering it through the sewing machine at those angles.
And this is the finished product.
I find that when you can't figure out how to pose for a picture, it's best to cover your eyes! ;)
I have to tell you guys, this was such a fun series to create! Although I don't do it as often as I would like, I love to up-cycle clothing. All of the projects in this series were relatively easy. I would definitely not consider myself to be a seamstress...I have a hard time sewing in a straight line! But I do have a sewing machine, and I know how to work it...or at least how to look something up in the manual and follow the instructions. So if I can do these, so can you! Don't be intimidated. Try them and show me what you got. Go and do one right now!!
Liked the post? Let me notify you of new posts. Don't worry, I hate SPAM and won't abuse your email address. :)
It's time for Part 4 of the Up-Cycled Sweater Series!! If you've missed the previous ones, be sure to check them out. In Part One, I made leg warmers, Part Two was how to make mittens and a hat, and Part Three was how to make arm warmers.
This time I turned a couple of sweater bodies into a sweater vest and an infinity scarf.
You may remember this sweater:
In Part 3, I cut off the arms and turned them into arm warmers/fingerless gloves. I have to tell you, I LOVE my arm warmers, but they were a little tricky to make...at least more than I anticipated. This sweater was made from 60% Cotton and 40% Acrylic. I found this to be a difficult fabric combination to work with, simply because it was so stretchy. Because of this I decided to take a simpler route for this next project.
After cutting off the sleeves, I used a seam ripper to rip the seam that held together the sleeves to the body (The seams at the shoulders). And because I am not that patient, nor do I like tedious activities (such as ripping seams), I accidentally made a couple of small holes in fabric. Oops! So I went back later and stitched them up by hand. Here's the results:
This also makes a cute sleeveless sweater for the Fall and Spring. The best part about this small little project is that there was NO HEMMING involved!!! (and if you don't tear holes in the fabric while ripping out the seams, there is no sewing either!) ;)
Then, I made an infinity scarf. Here was the sweater after the leg warmer project.
Cut off the top of the sweater, just below the armpits. Turn the body of the sweater inside out, pin the newly cut side, and hem it. I used the sewing machine...carefully.
While the sweater is still inside out, fold over the newly hemmed side, pin it, and hem it one more time. I didn't hem the bottom of the sweater (the part that sits at your waist), but if you want a more uniform look, you can repeat the folding, pinning, and hemming process at that end too.
And that's it!
Now you have a fun infinity scarf!! (By the way, this infinity scarf only took about 20 minutes to make. Bonus points for a fun, easy, and quick project!!)
There is one more part left in the sweater series. Don't miss it. It's coming soon.
:)
Liked the post? Let me notify you of new posts. Don't worry, I hate SPAM and won't abuse your email address. :)
Life Chapters - we all have them, but chooses to call them that. My life chapters have been defined by several events - going off to college, graduations, getting married, having a baby, and moving, just to name a few. But this weekend was the end of a chapter for me, and I didn't even realize it was closing until it happened.
Last week was a little bit of a sad week for me. The former pastor (Paul McEachern aka Brother Mac) of the church I grew up in passed away. His wife passed away about 18 months prior, and so he was alone. He went for a walk on Thursday, January 30th, and never came home. It wasn't until Sunday, when his neighbor realized his car hadn't moved in a couple days, nor had his paper been taken in, that everyone realized that something was wrong. His home was searched, but he wasn't found inside. His body was found in the desert near his home on Monday morning. Apparently he had gone for a walk and collapsed in the desert. There was an article written about him in the newspaper that you can read here.
I have known Brother Mac my whole entire life. Brother Mac married my parents and I grew up in his church. I've been told that as a baby, I used to scream when he would hold me. Every. Single. Time. And every single Sunday. He always insisted on holding me. But then one day, I stopped screaming. I got used to him. And I loved him.
He did fun little magic tricks by pulling a thimble out of your ear, or making a penny disappear into his elbow. He would pull out this ugly picture and tell everyone that this was his daughter or wife when she was younger, just to see how people would react. He would take drive all of the kids (myself included) to camp every year and insist on leaving at 1AM. He was undefeated at ping pong. And he would say ridiculous things that made no sense, just to get a reaction from us. He was quite the character. But he also had deep love for the Lord, and yearned to be in Heaven. He had a heart for the poor, for missions, and a deep desire for everyone to have a relationship with Christ.
His children had moved away married, and had children, so my parents always assisted Brother Mac and his wife when they needed something. In a way, Brother Mac was like a grandfather to us. In 2000, he retired from his church, and moved across town about 15 minutes from my parents. I had already gone off to college, and didn't see him or his wife very often. But every holiday, when they were not visiting their children and grandchildren, my parents would invite them over for dinner.
This past Saturday was Brother Mac's memorial service. My husband, son and I attended, as well as many others - former church attendees, evangelists, as well as a couple of significant leaders from his church's denomination. It was sad, but there was a sense of closure that could be found in the service too. But honestly, that closure made me feel even more sad. As I greeted several people before and after the service, I realized that this chapter in my life was coming to a close. Some of those people I hold very dear to my heart and have made a significant difference in my life. Many of those people I will probably never see again. My parents sold their house in the fall and now travel full time. Both of my siblings have moved away as well. My ties to El Paso have dwindled. I wasn't just saying goodbye to Brother Mac, I was saying goodbye to many friends and to this chapter in my life.
This was a sad realization for me. But I cannot linger in this chapter. Memories and reflection is good, but it is time to move on.
Ecclesiates 3:1-8 says, "There is an appointed time for everything. And there is a time for every event under heaven—
A time to give birth and a time to die;
A time to plant and a time to uproot what is planted.
A time to kill and a time to heal;
A time to tear down and a time to build up.
A time to weep and a time to laugh;
A time to mourn and a time to dance.
A time to throw stones and a time to gather stones;
A time to embrace and a time to shun embracing. A time to search and a time to give up as lost;
A time to keep and a time to throw away. A time to tear apart and a time to sew together;
A time to be silent and a time to speak.
A time to love and a time to hate;
A time for war and a time for peace."
Goodbye old friend,
I hope to keep in touch,
but even if we don't,
My life's affected much
I was planning on posting this with Part 2, but after the first two projects, I realized the blog was going to be way too long. So here's a straggler that really belongs to Part 2 with the accessories.
Arm warmers!!! Or fingerless gloves. Whatever you want to call them.
The first step is to cut the sleeves. Make sure to give yourself more length than you will probably need to allow room for mistakes. I used the trimmed end of the sleeves (the end that is closest to your shoulder when you wear a sweater) for my hands.
Turn your sleeve inside out, lay your hand on the sleeve, and trace an outline with chalk or a white pencil. (Sorry I don't have a photo of this.) Sew the areas that you marked off with the chalk/pencil, and then trim off the excess fabric.
While your sleeve is still inside out, flip the fabric of the fingers and thumb over and hem them. After several practice runs on leftover fabric from this sweater, I came to the conclusion that hemming it straight across with a sewing machine was impossible without stretching the fabric out and losing the shape, so I ended up hemming the sleeves by hand.
Once the hem was done, I still wasn't happy with the finished product. The arm warmers looked too plain to me, so I randomly sewed several buttons onto the hands.
...And now I love them!
One note - the sweater I used was made from 60% cotton and 40% acrylic. I've come to the conclusion that this is not the easiest fabric combination to use. It was so stretchy, I struggled to keep their shape intact while sewing. I would recommend using a different combination of fabric because of this. :)