I'm not good at crocheting. I decided I wanted to learn about 7 or 8 years ago. And so Sarah, from Undiscovered Virtues, showed me how. It was really funny. She was about 13 years old at the time. (By the way, she was quite the hysterical kid). She would tell me, "put this thingy here, and then put this thingy here, and then make it look like this." It was great. I still figured out how to crochet though. But I haven't worked at it very much over the last several years. This is why I'm not good at it.
I started crocheting a scarf, with the idea in mind that I would give it as a Christmas gift. It took me several hours to remember how to crochet, and I kept starting a couple of rows, and then unraveling them because they didn't look right. Finally I consulted YouTube and realized I was missing a couple of stitches. Ha! After that things got better. When I was about half way through the scarf, I realized that my stitches kept getting tighter and tighter. No matter how much I tried to keep things loose, I couldn't seem to make the rest of the stitches look as loose as the ones in the beginning.
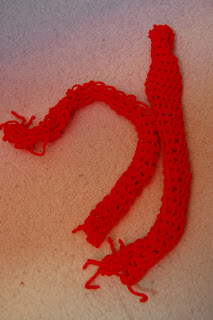
So this is how my scarf ended up. Notice the bottom layer of the scarf? See how one end is larger than the other. Yeah. Oops. Apparently it's been quite a while since I last crocheted...about 4 or 5 years.
Although this is not terribly noticeable, I decided not to use this as a Christmas gift and keep it for myself. The looser end really bugged me, but I was definitely not willing to unravel the whole thing and start again. Then I got an idea - what if I cinched up certain parts of the scarf? So this is what I did.
It was a pretty easy fix. I simply threaded a large plastic needle with matching yarn, tied the opposite end of the yarn onto and edge of the scarf, and wove the threaded yarn straight across to the other end, and tied off the yarn. Simple. Then I repeated it three more times in various areas of the scarf to make it look uniform throughout.
Not so bad, right??? Well...I think so. I'm thinking I should cinch it a couple more places, and maybe a little tighter? Just a thought.
So the next time one of your projects doesn't turn out quite right, get creative and see what you can do to recover it! :)
Wednesday, November 30, 2011
Sunday, November 27, 2011
Mohawk Knit Hat DIY (without actually knitting)
I've spent the last couple of weeks crafting to my hearts delight. Actually, I'm stuck on the couch most of the time to let my ankle heal, so I've been working on knitting and crocheting projects. This has kept me from losing my mind while confined to couch.
Here's one of my favorite projects that I've done lately.
I've seen tons of photos on Pinterest for knit and crocheted mohawk hats for kids. I've been wanting to make one for my son, but I'm not that good at crocheting, and I have no idea how to knit. But one night while laying in bed and thinking about those hats, I figured out how to make one - with a knitting loom! (I've come up with some of my best ideas while laying in bed. Seriously!)
 A knitting loom is a round circular frame, that allows you to "knit" by weaving the yarn around the pegs. I love this thing! I have a package with 4 different size looms and also includes a hook and large plastic needle. I've made so many fun things with these looms. Last year I made a couple of infinity neck scarves with them.
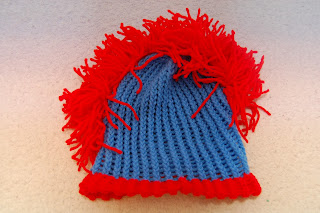
Anyway I started this project using the green loom, which has a 7.5 inch diameter. I used the red yarn for the brim, and the "Mohawk" and the blue yarn for the hat. The actual instructions for using the loom and weaving the yarn around it are included with the loom. I got my loom at Hobby Lobby.
The brim was the trickiest part of the hat. It took me three times to get it right. The first two times I wove the yarn too tight and actually broke the yarn and then ended up cutting the broken brim off the loom. Oops.
Making the Mohawk hair was easy, but a little time consuming. I made several small long and loose pom poms and hand stitched them down the center of the hat.
Here's how to make a pom pom:
Using a 2.5 inch piece of cardboard, wrap the yarn around the cardboard approximately 20 times.
After wrapping yarn, cut yarn leaving about inches to spare.
With a large needle, thread the long end of the yarn underneath the wrapped yarn, and tie a tight double knot at the bottom. (Note: if your knot is not tight enough, the yarn will fall out once it is made into a pom pom.
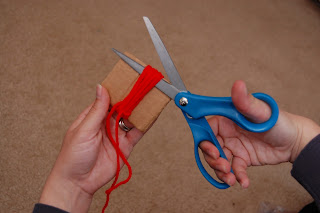
Next cut the wrapped yarn on the opposite end of the knot.
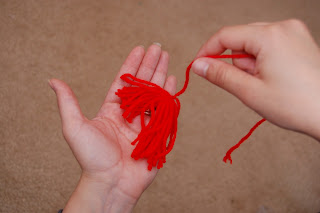
And there you go - a pom pom. Now make a bunch more. Use the long end to hand stitch the pom poms down the center of the hat to create the Mohawk.
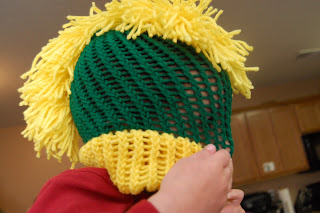
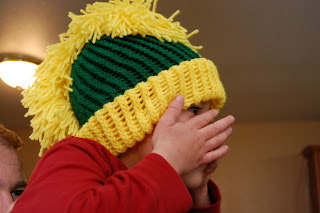
Here was the final result. It was cute, but I wasn't satisfied. I wanted the brim to be longer (up and down). And when I put it on The Toddler's head, it was a bit tight. So keeping this in mind, I made him another hat using the 9.5 inch knitting loom with yellow and green yarn. The yellow brim was approximately 20 rows of stitches, and the green part was 22 rows of stitches.
I'm much more satisfied with the second hat I made, and The Toddler loves it! He wears it all the time. It's such a great feeling when I make something for him that he actually loves. :)
Total time for making a hat : about 8 hours.
Total cost for me: free - I had both the yarn and the looms.
Liked the post? Let me notify you of new posts. Don't worry, I hate SPAM and won't abuse your email address. :)

Here's one of my favorite projects that I've done lately.
I've seen tons of photos on Pinterest for knit and crocheted mohawk hats for kids. I've been wanting to make one for my son, but I'm not that good at crocheting, and I have no idea how to knit. But one night while laying in bed and thinking about those hats, I figured out how to make one - with a knitting loom! (I've come up with some of my best ideas while laying in bed. Seriously!)

Anyway I started this project using the green loom, which has a 7.5 inch diameter. I used the red yarn for the brim, and the "Mohawk" and the blue yarn for the hat. The actual instructions for using the loom and weaving the yarn around it are included with the loom. I got my loom at Hobby Lobby.
The brim was the trickiest part of the hat. It took me three times to get it right. The first two times I wove the yarn too tight and actually broke the yarn and then ended up cutting the broken brim off the loom. Oops.
Making the Mohawk hair was easy, but a little time consuming. I made several small long and loose pom poms and hand stitched them down the center of the hat.
Here's how to make a pom pom:
Using a 2.5 inch piece of cardboard, wrap the yarn around the cardboard approximately 20 times.
After wrapping yarn, cut yarn leaving about inches to spare.
With a large needle, thread the long end of the yarn underneath the wrapped yarn, and tie a tight double knot at the bottom. (Note: if your knot is not tight enough, the yarn will fall out once it is made into a pom pom.
Next cut the wrapped yarn on the opposite end of the knot.
And there you go - a pom pom. Now make a bunch more. Use the long end to hand stitch the pom poms down the center of the hat to create the Mohawk.
I'm much more satisfied with the second hat I made, and The Toddler loves it! He wears it all the time. It's such a great feeling when I make something for him that he actually loves. :)
Total time for making a hat : about 8 hours.
Total cost for me: free - I had both the yarn and the looms.
Liked the post? Let me notify you of new posts. Don't worry, I hate SPAM and won't abuse your email address. :)

Labels:
child,
children,
create,
Crochet,
DIY Mohawk hat,
Hat,
kid,
Knit,
knitting loom,
No knit hat,
toddler,
weaving,
winter hat,
yarn
Wednesday, November 23, 2011
Thankful.
I usually avoid writing about topics talking about being thankful around Thanksgiving. I find them sappy. Isn't that horrible? I know. It is. Ha ha. But despite my cynical attitude, I promise I really am thankful. I am thankful for many things. But I feel very blessed to have my husband, and my son in my life. My husband is my best friend, and greatest support. My son fills my heart with love. I am thankful for them.
I took this photo of my husband and son about two years ago. My son was about 7 months old. We were at a pumpkin patch waiting for the hayride.
Happy Thanksgiving!
I took this photo of my husband and son about two years ago. My son was about 7 months old. We were at a pumpkin patch waiting for the hayride.
Happy Thanksgiving!
Labels:
baby,
black and white,
parenting,
photography
Saturday, November 12, 2011
Adventures With a Sprained Ankle
Here's a couple of thoughts, observations, and comments I have concerning a sprained ankle:
- When I was a kid, I used to fantasize, yes fantasize, about how awesome it would be to have an injury that would require crutches. Since then I have gotten over that foolish fantasy.
- I hate/love the fact that I need to stay off my feet as much as possible. Since becoming a mom a couple of years ago, I long for the time when I can recline on the couch all day and do nothing. But now that I HAVE to do this, I find it very boring, and frustrating. I have so many things I want to get done, but shouldn't be doing.
- Wearing the boot, brings me to a new level of frumpiness, that I have never before achieved. When I stay home for the day, I wear sweats and boots. (Maybe I should say A Boot). Yes boots. Because a boot with my bionic boot, it keeps my foot at the same level as my foot in the bionic foot. Otherwise, it feels like you are walking with only one heel. Very uncomfortable.
- Since I look so frumpy at home, I really try to make the effort to look nice when I go out of the house. However, the bionic boot really takes away from my outfits. ;) After I would get dressed in the morning, I would walk downstairs and show my husband and say, "Fabulous!" (referring to my outfit). Now I walk downstairs and say "Almost Fabulous." Ha.
- I only wear my right shoes these days. (for obvious reasons). I have a pile of right shoes at the foot of my bed. Because that's where I take them off before getting into bed at night. I believe I might have a hard time finding the matches to each of my shoes once I don't have to wear the bionic boot anymore.
- I feel incredibly dumb telling people how I sprained my ankle. Especially the part about going down the slide.
- Believe it or not, I really, really, really miss exercising. I feel so tired and sluggish when I don't exercise. Blah. I'm also really sad that I'm missing great cycling weather. This makes me really sad. I've actually considered trying to cycle with a sprained ankle, but I decided that would not be a good idea. Ha ha.
- I've been letting The Toddler watch waaay more TV than he should lately - to keep him occupied while I rest. I feel so guilty about it.
- I think having an injury and walking around with a heavy bionic boot all day must make me extra tired, because I have been sleeping way more than usual.
- 2 weeks down, and 4 more to go. This feels like forever.
Liked the post? Let me notify you of new posts. Don't worry, I hate SPAM and won't abuse your email address. :)

Labels:
everyday life,
life,
motherhood,
parenting,
Sprained ankle
Friday, November 11, 2011
Shaving Cream Paint
A couple of nights ago, I needed an activity to occupy my son long enough to keep my sanity until his bedtime. So I consulted my "Kids Activities" board on Pinterest and found an excellent pre-bath time activity. Shaving Cream Paint. Oh yes.
All it required was shaving cream, food coloring, a muffin tin, and a brush (I used an old basting brush).
I allowed The Toddler to add the food coloring to each cup of shaving cream, which he LOVED. By the way, that greyish color was supposed to be purple. Just so you know.
Then I put the toddler the tub, and let him paint his little heart out. He had a blast.
The only drawback to this activity is if your toddler announces that he needs to pee, and is covered with shaving cream paint. Just make sure you have an old towel handy!
The best part about this is the easy clean up! Rinse the shaving cream off of your bathtub (and walls) with a cup of water! Ta-Dah! Done. And then throw your kid in the bath to finish up. And then bed. That's my favorite part. :)
Thursday, November 10, 2011
No-Sew Scrap Fabric Tutu
My goal for this Christmas season is to make as many gifts for others as possible instead of buying them. I have been making a mental list of the gifts I want to give my family members for a couple of months. A couple of days ago, I realized that Christmas is next month! So I need to get started on all my fun DIY Christmas gifts. I'm not sure if I will be displaying all my gifts, since several of my family members read my blog. I don't want to ruin the surprise. (Maybe I'll post some after Christmas...we'll see).
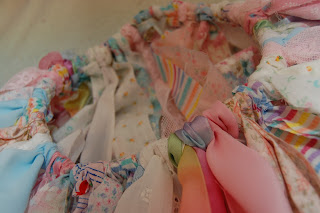
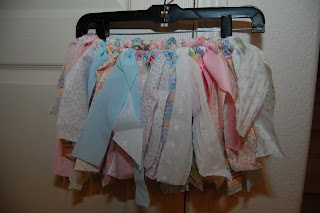
I made my niece a scrap fabric tutu for Christmas. I've seen a couple of them on Pinterest, but I ended up doing my the tutu my own way. I wanted to make a tutu that had an adjustable waist band, and I didn't want to sew it. (I don't like digging through the back of my closet for my sewing machine and then hauling it downstairs.) So here's my version on the No-Sew Scrap Fabric Tutu.
All I used was:
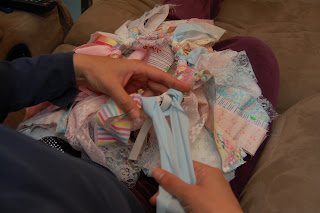
Fold the fabric strip in half and pull the middle section of the strip under the elastic. Pull the middle section, which now looks like a loop, above the elastic.
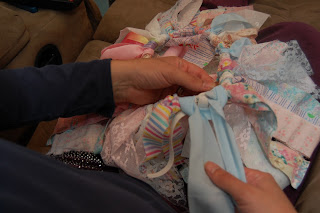
Then pull the end of the fabric strip through the loop and tighten. Repeat this with each of your strips all the way around the elastic until you have a full tutu. I would recommend putting your elastic around a coffee canister or something around that size to keep the elastic tight as you tie on the fabric.
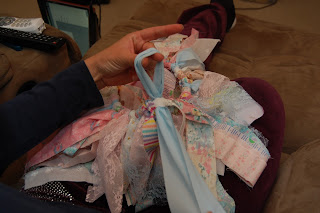
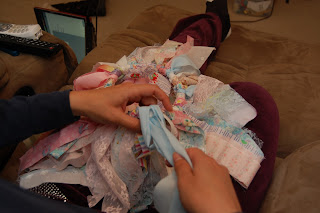
It should end up looking similar to this.
Once you have knotted your fabric all the way around the elastic, push the fabric away from the knotted end of the elastic,
and hide the knot by tying a cow hitch knot around the elastic knot. And that's it! Easy, right? And since I only tied the elastic with a knot, I can easily loosen or tighten according to my niece's waist size.
Total cost: absolutely free!!! I used scraps from my collection, and I already had elastic.
Total time: about 2 hours. I measured the strips out and cut them with scissors, but if you have a rotary cutter, it would go a lot faster.
I cannot wait to give this to my niece! Too bad that I don't have a little girl to model this for me. So for now, you get to look at it on a hanger. ;)
Liked the post? Let me notify you of new posts. Don't worry, I hate SPAM and won't abuse your email address. :)

I made my niece a scrap fabric tutu for Christmas. I've seen a couple of them on Pinterest, but I ended up doing my the tutu my own way. I wanted to make a tutu that had an adjustable waist band, and I didn't want to sew it. (I don't like digging through the back of my closet for my sewing machine and then hauling it downstairs.) So here's my version on the No-Sew Scrap Fabric Tutu.
All I used was:
- Scissors
- A strip of elastic long enough to wrap around my niece's waist
- A bunch of scrap fabric - cut into strips about 1.5 inches thick and anywhere between 17 to 22 inches long. I varied up the length of the fabric, just to add a little more depth to the tutu.
Fold the fabric strip in half and pull the middle section of the strip under the elastic. Pull the middle section, which now looks like a loop, above the elastic.
Then pull the end of the fabric strip through the loop and tighten. Repeat this with each of your strips all the way around the elastic until you have a full tutu. I would recommend putting your elastic around a coffee canister or something around that size to keep the elastic tight as you tie on the fabric.
It should end up looking similar to this.
Once you have knotted your fabric all the way around the elastic, push the fabric away from the knotted end of the elastic,
Total cost: absolutely free!!! I used scraps from my collection, and I already had elastic.
Total time: about 2 hours. I measured the strips out and cut them with scissors, but if you have a rotary cutter, it would go a lot faster.
I cannot wait to give this to my niece! Too bad that I don't have a little girl to model this for me. So for now, you get to look at it on a hanger. ;)
Liked the post? Let me notify you of new posts. Don't worry, I hate SPAM and won't abuse your email address. :)

Labels:
Christmas gift ideas,
create,
DIY tutu,
easy,
girls,
no-sew,
scrap fabric,
scrap fabric tutu,
tutu
Wednesday, November 9, 2011
Play-Doh Fun.
My son has been really into play-doh lately. There have been times when he has literally spent an HOUR sitting at the table, entertaining himself with play-doh. Amazing, right?
I rarely get around to buying play-doh for him, so I usually end up making it. I recently came across a play-doh recipe on Pinterest that uses Jello mix. Kind of wierd? I thought so, but I've seen that recipe pinned several times, so I decided to try it. I have to tell you, it was great! Here's the recipe:
Ingredients:
- white flour – 1 cup
- salt – 2 tbsp
- cream of tartar – 2 tbsp
- cooking oil – 2 tbsp
- warm water – 1 cup
- Jello – 1 3oz pack
Directions:
- Add all the ingredients together in a big mixing bowl
- Mix all the ingredients together until consistent
- Pour into a pan and stir continuously
- Wait for it to thicken into a big ball and then place it on a piece of wax paper to cool
- Kneed it for a few minutes once cooled with some flour
- Add any food coloring or glitter to spice things up!
- Start playing!
One of the keys to the play-doh success has been keeping it interesting. Over the past several months, I've been collecting random things from our house that create interesting impressions. Here's a couple of things that we use: various sized balls and unique textures, plastic animals and bugs, rulers, cookie cutters, sea shells, seeds, stamps, lids, lego pieces, nets (packaging from popsicles), forks, and even Hot Wheel cars (added by my son).
I'm pretty sure that The Toddler's favorite play-doh item are the Hot Wheel cars.
Here's one of The Toddler's play-doh creations. What unique items do your kids use with play-doh?
Tuesday, November 1, 2011
Halloween Festivities
Do you want to know what I've been up to over the past several days? Lots! We've visited a pumpkin patch, Dressed up the toddler for various Halloween Events, taken him Trick or Treating and I even sprained my ankle! That's right, I sprained my ankle. Boo!
On Friday, we went with our mom's group to visit a pumpkin patch. Innocent enough, right??
There was a petting zoo with a cute little pony who adored the kids and stood next to the fence so all the little ones could pet him.
And we went on a hayride, where I forced my son to take a picture with me. See how happy he is to get his picture taken? (p.s. I'm wearing my mom's shirt from the 70's. My dad bought it for her when they were engaged. vintage. yes)
And The Toddler was allowed to pick out his very own pumpkin. This is the one he chose. He carries it around the house too, because he is so proud of it.
But there was this one slide at the pumpkin patch. This is the top of the slide in the picture - that big black tube. It was a bad slide. I went down it with my son and his friend. The slide was steep, and I was holding 50+ pounds of extra weight going down the slide. I couldn't slow myself down in time. So I slammed into the ground at the bottom. But I didn't drop the 2 toddlers. Just so you know. My ankle twisted outward really far. Fortunately I was wearing my cowboy boots (love those) and they have extra support around the ankles. I'm confident that if it wasn't for my boots, my ankle would be broken. It took me a couple of minutes before I could stand up. We did a couple more activities at the pumpkin patch before the pain began to really set in and we had to go home.
And now I get to wear this. Isn't that great? Not so much. Pretty certain it's a sprain and not a break - just by the way it feels. (I've had breaks and sprains before). I haven't gone to the doctor, but mostly because I'm pretty certain it's only a sprain - but there is definitely no walking on it. So the boot is my next best option. And this is how I spent the next several days - when we weren't doing other fun things.
We also went to the Zoo Boo and the Toddler chose to dress like Superman. See how excited he is to take a picture here too? I tried to convince him to wear his cute monkey costume, but he wasn't interested. Whatever. We stayed at the zoo until it became unbelievable crowded and my ankle started to ache, and I felt the need to mow people down for not moving out of the way for a lady with a gimpy leg. (aka me)
My parents also came to into town to visit us. My mom and I checked out a couple of antique shops. Because we like that sort thing - even if we don't buy anything. It's always fun to look at the unique stuff. Here are a couple of things I liked and a couple of things I found amusing.
Check out this scooter! How awesome is this???
This circley wire thing is a vintage flower holder. This would be an awesome DIY project.
I'm not so sure I understand the outfit on his manikin...hmm....
Halloween costume anyone? Nice.
So to end it all, we dressed up the Toddler in his awesome monkey costume took him trick or treating to a couple of neighbor's houses, and then took him to a Trunk or Treat at our church.
I forgot to take more pictures of his cute costume. I was busy having a sprained ankle. Ha.
We had lots of fun over the past several days (except for the sprained ankle part. That wasn't very fun), but I am glad the festivities are over. Now, onto Thanksgiving. :)
On Friday, we went with our mom's group to visit a pumpkin patch. Innocent enough, right??
There was a petting zoo with a cute little pony who adored the kids and stood next to the fence so all the little ones could pet him.
And we went on a hayride, where I forced my son to take a picture with me. See how happy he is to get his picture taken? (p.s. I'm wearing my mom's shirt from the 70's. My dad bought it for her when they were engaged. vintage. yes)
And The Toddler was allowed to pick out his very own pumpkin. This is the one he chose. He carries it around the house too, because he is so proud of it.
But there was this one slide at the pumpkin patch. This is the top of the slide in the picture - that big black tube. It was a bad slide. I went down it with my son and his friend. The slide was steep, and I was holding 50+ pounds of extra weight going down the slide. I couldn't slow myself down in time. So I slammed into the ground at the bottom. But I didn't drop the 2 toddlers. Just so you know. My ankle twisted outward really far. Fortunately I was wearing my cowboy boots (love those) and they have extra support around the ankles. I'm confident that if it wasn't for my boots, my ankle would be broken. It took me a couple of minutes before I could stand up. We did a couple more activities at the pumpkin patch before the pain began to really set in and we had to go home.
And now I get to wear this. Isn't that great? Not so much. Pretty certain it's a sprain and not a break - just by the way it feels. (I've had breaks and sprains before). I haven't gone to the doctor, but mostly because I'm pretty certain it's only a sprain - but there is definitely no walking on it. So the boot is my next best option. And this is how I spent the next several days - when we weren't doing other fun things.
We also went to the Zoo Boo and the Toddler chose to dress like Superman. See how excited he is to take a picture here too? I tried to convince him to wear his cute monkey costume, but he wasn't interested. Whatever. We stayed at the zoo until it became unbelievable crowded and my ankle started to ache, and I felt the need to mow people down for not moving out of the way for a lady with a gimpy leg. (aka me)
My parents also came to into town to visit us. My mom and I checked out a couple of antique shops. Because we like that sort thing - even if we don't buy anything. It's always fun to look at the unique stuff. Here are a couple of things I liked and a couple of things I found amusing.
Check out this scooter! How awesome is this???
This circley wire thing is a vintage flower holder. This would be an awesome DIY project.
I'm not so sure I understand the outfit on his manikin...hmm....
So to end it all, we dressed up the Toddler in his awesome monkey costume took him trick or treating to a couple of neighbor's houses, and then took him to a Trunk or Treat at our church.
I forgot to take more pictures of his cute costume. I was busy having a sprained ankle. Ha.
We had lots of fun over the past several days (except for the sprained ankle part. That wasn't very fun), but I am glad the festivities are over. Now, onto Thanksgiving. :)
Labels:
activities,
antiques,
everyday life,
Fall Fun,
Halloween,
Injury,
kids fun,
Mom,
motherhood,
petting zoo,
pumpkin patch,
Sprained ankle,
Trick or Treat,
zoo,
zoo boo
Subscribe to:
Posts (Atom)


