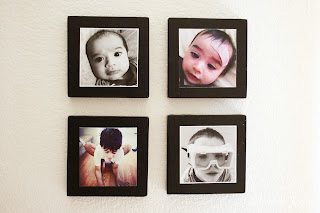
One. More. Instagram. Project. This is a fun one. What am I saying? They're all fun! But I think this one is my favorite. If you haven't seen the other two, you can find them here and here.
I have a couple of favorite photos. Photos that stand out for one reason or another. A funny moment. A cute expression. A personality trait captured. This project is for the extra-special ones. The ones worth framing. The ones you don't mind seeing day after day. This is the perfect way to preserve those special memories and display them for everyone else to see. Good memories.
Here's the supplies you need:
- 1x6 board
- 4x4 size Instagram photos
- Mod Podge Matte finish
- black spray paint (Satin finish)
- sponge brush or paint brush
- ruler
- drill (don't be scared. you only need to drill a small hole)
- handheld electric sander or sandpaper
Before we get started, lets talk about lumber. Originally I had the idea to mount an Instagram photo onto a 2x4. Good idea, right? Not so much. When I placed the photo over a 2x4, the photo was actually larger than the plank. So after this, my husband explained that lumber is not actually true to size. A 2x4 is actually 1 1/2 x 3 1/2 inches, so a 2x4 won't work. Instead I chose to use a 1x6 (which is actually measures 3/4 x 5 1/2 inches). Make sense?
So start by cutting the1x6 into four 5 1/2 x 5 1/2 inch squares. (Often times you can ask them to cut them for you at the hardware store when you purchase the lumber). My husband taught me how to work the table saw for this project, so I am proud to say that I cut these blocks myself...but I was terrified as I was running the table saw.
Using sandpaper or electric sander, smooth out the sharp edges and corners to create a softer look.
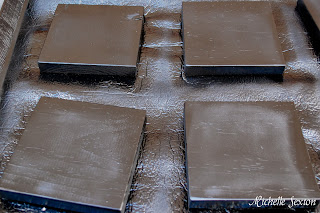
Spray paint the top and each side of the block. (I promise the blocks are actually painted black. The lighting was so weird when I took pictures of them.)
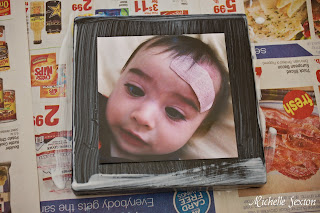
Using Mod Podge, paint both the top and each side of the block and place your photo in the center of the block.
Allow to dry, and paint a couple additional layers of Mod Podge over the photo to seal and protect it. (This will not destroy the integrity of the photo).
Once it's completely dry, flip the block over to the backside and mark a spot 3/4 of inch below the top edge and centered (2 3/4 inches across). Next paint a layer of Mod Podge over the back side of the block for added protection (and to keep any paint that may of leaked onto the backside from rubbing off on your wall when you hang these up).
Drill a hole (deep enough to hang from a nail) into the mark you made on the back of the block. Be careful to not to drill all the way through. This was my first experience using a drill (for real) so I did a couple of practice drills on a piece of scrap wood before I attempted to drill a nail hole in my Instagram blocks.
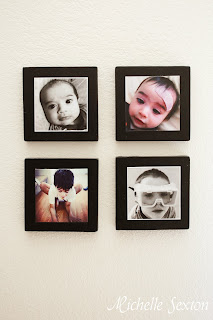
Wa-la! The hardest part of this project is finding the perfect place in your house to display these terrific photos. Well, maybe that's just my dilemma...
Here's a couple of tips:
- After you place the photo on top of the first layer of Mod Podge, I recommend placing some small and weighted on top of the photo around the edges to keep the photo from curling up as it dries.
- The wood block stuck to the newspaper as a result of dripping excess Mod Podge after it dried. Use a knife or box cutter to carefully scrape off the extra Mod Podge.
- After sanding down the edges, I strongly recommend a thorough wipe down of each block to prevent sawdust on your block as the project progresses. The same goes for after your spray paint it.
This was such a fun project for me that I want to do it again. I'm also going to mount the boys' sonogram pictures with their names underneath. I'm also thinking of finding some photos to decorate our downstairs bathroom, which is nothing but an empty white room. There are so many possibilities with this project.
Enjoy, friends!
Thursday, September 26, 2013
Tuesday, September 24, 2013
Jealousy vs. Contentment
Confession: I don't like Facebook. But I'm still on it. I've realized that this is the best way to keep in touch with friends and family that I don't see on a regular basis. I have several reasons that I don't like it, but here is one gigantic reason this particular social media platform drives me crazy.
Jealousy. Seriously. I know I'm not alone. I've read statistics on Facebook jealousy. A lot of people struggle with it. Personally, I have no problem when I see my friends post photos of their amazingly exotic vacations. It's like I get to live vicariously through them when I see their photos. However, I have a hard time when I read status updates or see photos from my mom friends getting together for play dates. Without me. But it's not like they're trying to exclude me, in fact, I know they aren't. Often times I was invited to join them but declined, because the play date interfered with one of Cheese's naps.
So at these times, I have to remind myself why I do what I do. Cheese is still little. Naps are important, and having a well-rested child dramatically improves our home life. So even though I may not like missing out on all the play-dates my friends attend, this is only a temporary situation. Cheese won't always need naps. As he begins to outgrow them, we will join our friends for play-dates again.
At some point everyone struggles to stay content with their current circumstances. It can be difficult to just accept our current situation in life, especially if it's beyond our control. It's so easy to compare your circumstances with someone else, and Facebook makes it easier. Comparison and jealousy can creep into your life without a conscious realization, and it's so important keep your heart guarded from these invasions. It's crucial to remember that when our lives line up with God's will for us, these circumstances are often ordained by Him. There is always something we can learn from our current circumstance. What do you need to learn from your circumstance?
I doubt that every has issues with Facebook in the same way that I do, but I do know that every one struggles with jealousy from time to time. One of the best ways to defend yourself is to keep your mind and heart on things from above.
- "...for I have learned the secret of being content in any and every situation, whether well fed or hungry, whether living in plenty or in want." Philippians 4:11-12
So the next time you find those jealous feelings rising up, Stop. Remind yourself of the importance of maintaining a content mindset, and ask yourself, "What is it that I need to learn from this situation?"
Thursday, September 19, 2013
5 Awesome Autumn Hot Drink Recipes
Is anyone in the mood for Fall yet? Maybe we should call it Autumn. Don't you think the word "Autumn" is more inspiring than "Fall"? I do. There are so many things to love about this season - the cooler weather, changing leaves, boots, scarves, the State Fair (ours is in September), the Balloon Fiesta, Pumpkin Patches, and no more bugs (hooray)! There's something about Autumn that makes you feel cozy and nothing helps that more than a warm beverage to sip as the chilly mornings begin.
So, here are 5 Autumn inspired hot beverage recipes to keep you warm.
1. Salted Caramel Hot Chocolate - A plain cup of hot chocolate really isn't my thing. But salted caramel most definitely is. I haven't been able to shake the Salted Caramel/Chocolate flavor out of my mind lately. It's just so good! This was a huge hit when I made this for a group of my friends. They loved it so much, I had several requests for seconds.
2. Pumpkin Spice Latte - Who doesn't like Pumpkin Spice Lattes? My husband and I love making these when the weather is cool. Plus, it's much cheaper than the $5 version you purchase from your coffee shop.
3. Caramel Apple Spice Cider - Caramel + Apples are basically a match made in Heaven. Flavor combinations like this make the perfect Autumn beverage. This is a great mock version of Starbucks' recipe. Why should Starbucks be the only who can make it?
4. Mexican Hot Chocolate with Dulce de Leche Spiced Cream - Are you serious? This is a drink??? Mexican Hot Chocolate and Dulce de Leche??? Two amazing flavors. How did I not know about this sooner? Maybe the rest of you did and I live under a rock. Either way, this drink is definitely worth trying.
5. Pumpkin Chai Tea - It's CHAI and it's made in a crockpot! What more is there to love about a recipe when all you need to do is dump the ingredients into a pot, turn it on, and Bam! Like magic, it makes itself. And it has pumpkin! What more could you ask for?
Just looking at these drinks makes me feel warm an cozy. I'm now inspired to get my Fall Craft on. ;) Do you have a favorite Autumn drink?
Tuesday, September 17, 2013
Thoughts about Birthday Parties for Little Ones Under 5
Can we talk about birthday parties? Let's talk about birthday parties. I have birthdays on the brain because Cheese (aka the younger son - read the About Me section for a better explanation) is turning one. Exciting and sad all at once.
Birthdays are typically a big deal. Kids' birthdays seem to be a huge deal. After 4 years of planning birthdays, I have a come to a couple of conclusions.
Hosting a birthday party at your home is a LOT of work. Often times it's easier and cheaper to pay a venue to host a party.
I hosted Mac's first and second birthday parties at my house. It was a LOT of work. In addition to making sure our house was spotless, there were endless hours googling birthday theme ideas, food prep, and party details. Details, details, details...
When Mac turned 3, I was pregnant with Cheese (Such a weird sentence). Since I felt like sleeping (or puking) most of the time, the last thing I wanted to do was plan a toddler's birthday party. So, we ended up hosting his birthday at Chick-Fil-A, one of the most inexpensive places in town to have a party. Win!
Mac's birthday party was so easy and inexpensive that we returned for his fourth birthday. This time, though, it was at his request. (LOVE this kid).
We ended up spending so much less money by hiring a venue than we had by hosting it at our house. The decorations, activities and food ended up surpassing the cost of simply paying someone else to do it all!
The birthday party probably won't be remembered by your kid or their friends for longer than a couple of weeks.
Pinterest is awesome, but it also gives unrealistic expectations for hosting events. Specifically, kids' birthday parties. I've seen AMAZING birthday parties on there. The problem is after seeing those ideas, anything less than the immaculate parties you saw are going to seem lame. There's no way you want to give your child a lame birthday party, right? Let me ask you something, do you remember each birthday party you attended as a child? What about the cakes and decorations?
If you are anything like me, you can only vaguely recall two or three, but that's about it. I certainly don't remember any parties before I turned 5.
Every parent wants the best for their child, and birthdays fall in line with that desire. So, we spend hours upon hours planning, baking, cleaning and setting up for a birthday party. The thing is, they probably won't be able to remember it for longer than a couple of weeks. So, maybe we need to rethink how much time and energy we put into the inconsequential party details.
That hand-painted pendant banner probably won't be remembered by your guests and will end up sitting in your closet for a couple years before you finally convince yourself to toss it. Instead a couple of decorations from the Dollar Store will still provide a fun and celebratory atmosphere. Plus it's so much less work!
Keep your life simple and provide an easy and inexpensive party. Skip the hand-made decorations and hand-crafted party favors.
At this age, (like under the age of 5) most kids aren't going to care WHAT you do at a party, they just want to play. And what about party favors? Really, party favors provide temporary amusement, but little else. Honestly, most of the party favors end up in the bottom of the toy box or trash sooner rather than later.
As a mom, some of my favorite party favors are fruit snacks and play-doh (Though I do have a couple mom friends that despise play-doh).
So, what am I saying? Give your kid a crappy party, because they won't remember it? Skip the party favors, because they'll end up in the trash anyway? Not at all! Let's just tone it down some. Immaculate parties are just not necessary, especially since most of it won't be remembered anyway. Let's simplify. The purpose of a birthday party is to celebrate a birthday. You can still celebrate without a meticulously detailed party.
Above all else, don't exhaust yourself over party details. It's just not worth it!
Cheese's birthday is in a couple weeks. We plan to invite both sets of grandparents over to our house, sing Happy Birthday to him, and eat cake. However, as my boys get older and if they want a spectacular themed birthday party, I'm totally game. But they're going to have to help. ;)
Birthdays are typically a big deal. Kids' birthdays seem to be a huge deal. After 4 years of planning birthdays, I have a come to a couple of conclusions.
Hosting a birthday party at your home is a LOT of work. Often times it's easier and cheaper to pay a venue to host a party.
I hosted Mac's first and second birthday parties at my house. It was a LOT of work. In addition to making sure our house was spotless, there were endless hours googling birthday theme ideas, food prep, and party details. Details, details, details...
When Mac turned 3, I was pregnant with Cheese (Such a weird sentence). Since I felt like sleeping (or puking) most of the time, the last thing I wanted to do was plan a toddler's birthday party. So, we ended up hosting his birthday at Chick-Fil-A, one of the most inexpensive places in town to have a party. Win!
Mac's birthday party was so easy and inexpensive that we returned for his fourth birthday. This time, though, it was at his request. (LOVE this kid).
We ended up spending so much less money by hiring a venue than we had by hosting it at our house. The decorations, activities and food ended up surpassing the cost of simply paying someone else to do it all!
The birthday party probably won't be remembered by your kid or their friends for longer than a couple of weeks.
Pinterest is awesome, but it also gives unrealistic expectations for hosting events. Specifically, kids' birthday parties. I've seen AMAZING birthday parties on there. The problem is after seeing those ideas, anything less than the immaculate parties you saw are going to seem lame. There's no way you want to give your child a lame birthday party, right? Let me ask you something, do you remember each birthday party you attended as a child? What about the cakes and decorations?
Every parent wants the best for their child, and birthdays fall in line with that desire. So, we spend hours upon hours planning, baking, cleaning and setting up for a birthday party. The thing is, they probably won't be able to remember it for longer than a couple of weeks. So, maybe we need to rethink how much time and energy we put into the inconsequential party details.
That hand-painted pendant banner probably won't be remembered by your guests and will end up sitting in your closet for a couple years before you finally convince yourself to toss it. Instead a couple of decorations from the Dollar Store will still provide a fun and celebratory atmosphere. Plus it's so much less work!
Keep your life simple and provide an easy and inexpensive party. Skip the hand-made decorations and hand-crafted party favors.
At this age, (like under the age of 5) most kids aren't going to care WHAT you do at a party, they just want to play. And what about party favors? Really, party favors provide temporary amusement, but little else. Honestly, most of the party favors end up in the bottom of the toy box or trash sooner rather than later.
As a mom, some of my favorite party favors are fruit snacks and play-doh (Though I do have a couple mom friends that despise play-doh).
So, what am I saying? Give your kid a crappy party, because they won't remember it? Skip the party favors, because they'll end up in the trash anyway? Not at all! Let's just tone it down some. Immaculate parties are just not necessary, especially since most of it won't be remembered anyway. Let's simplify. The purpose of a birthday party is to celebrate a birthday. You can still celebrate without a meticulously detailed party.
Above all else, don't exhaust yourself over party details. It's just not worth it!
Cheese's birthday is in a couple weeks. We plan to invite both sets of grandparents over to our house, sing Happy Birthday to him, and eat cake. However, as my boys get older and if they want a spectacular themed birthday party, I'm totally game. But they're going to have to help. ;)
Thursday, September 12, 2013
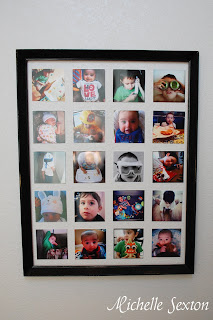
Fake Framed Instagram Grid
So many photos and not enough ways to display them? Wait no more, friends. Behold, I bring you another Instagram project! Rejoice.
This photo grid is a fun take on those classic framed photo collages that everyone seemed to have in their house when they were growing up. You know the kind with matte cut-outs in circles, squares, and rectangles? That was so 20 years ago..oh wait...you didn't have one in your house? Never mind. Apparently it was just my house. ;)
Anyway, lets just skip the awkward matte cut out shapes and tape them straight to the wall. Why not?
Supplies Needed:
- Instagram Photos (I used 20 photos, 4x4 size)
- empty frame (without backing or glass)
- masking tape
- nail
- hammer
- bubble level
I made this collage by starting at the top left corner, working my way across from left to right and then moving down.
Choose a spot on the wall to begin your collage and mark it with a pencil
Add masking tape to the back of the first picture and place it over the marked spot on the wall.
Using a bubble level, check to see that the photo is straight, vertically and horizontally. (This step is important - an empty frame will not hang properly over a crooked photo grid.)
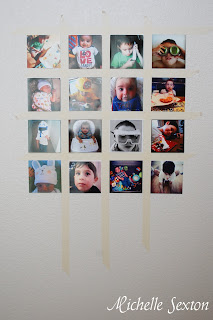
Once the photo is straight, tear two long strips of masking tape. Place one strip above the photo, and the other strip to the right side of the photo, making a "T" shape. The edges of the tape should fit snugly against the photo. Check each tape strip with a leveler to assure straight lines. Adjust tape if necessary. The masking tape creates a temporary border around the photos to assist with even spacing and straight lines.
Place another photo against the edge of right side of the vertical tape strip, as pictured above. Be sure that the top edge of the photo lines up with the horizontal tape strip above as well. Add another strip of tape against the right edge of the second photo. Be sure that tape strips are straight. Place another photo.
Repeat the photo/tape strips until you have completed the first row of photos.
To begin a new row, place a long strip of tape below the first row of photos. Add a photo below each photo in the first row.
Every so often, use the level to double-check the straightness of the grid. Make adjustments, if necessary.
As the grid progresses, the photos will be easier to place without double checking the straightness.
Once you finish, depending on the number of photos used, the photo grid will look something like this:
At this point I know you are super-anxious to rip off those tape strips, but there's a couple more important steps to do.
Hammer a nail into the wall above the photo grid at the center. (check your frame to see how your frame hangs. I didn't use any measurements here. I just "eyeballed" it.)
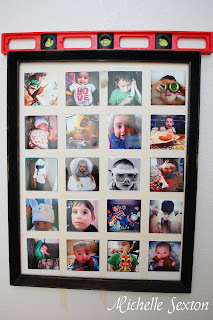
Hang the frame over the taped photo grid and place the leveler on top of the frame. Adjust the frame so that it hangs evenly over your photo grid. If the frame is level and the grid somehow isn't, pull off the frame, and adjust pictures until level. Re-hang the frame and check again. (If you checked the straightness of the photos throughout the taping process, the grid should come out even.)
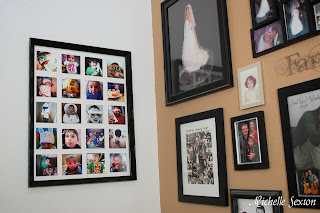
Once you are happy with frame over the photo grid, pull off that tape, and stand back to admire your handiwork.
Not too hard, right?
Here's a couple of tips -
- I would recommend trying a shaped grid inside of the frame, like maybe an "x" or even a heart. However, since I literally ordered 87 Instagram photos, I wanted to use as many photos in this grid as possible, which is why I chose the ever-so-standard rectangle shape.
- This project takes a small amount of patience, but not too much. The best way to get straight and even photos is to start with the first photo you place. Make sure it's level, both vertically and horizontally. If this photo is not straight, the rest of the grid will come out crooked.
I have one more fun Instagram project coming soon. Pretty sure this next one is one of my favorites.
Tuesday, September 10, 2013
When Life Doesn't Go As Planned
I've wanted to share this story for a long time, but I've never been quite sure how or when to share it.
Sometimes, despite all the planning, life doesn't go the way you expect it to, you know? My older son's first year of life was like that. He was a hard baby. Very hard.
He was born at 37 weeks. Not a premature baby, but a preterm baby.
Because he was born a little early, he struggled with nursing. But we kept at it. Within the first couple of weeks, he started projectile vomiting. (I cannot tell you how may times I've been puked on). We also struggled to keep him on a growth curve. Any growth curve. He cried a LOT. He was hungry literally ALL the time, and he was always cranky. We visited lactation consultants. We had blood tests done. We tried a couple different antacids. I changed my diet several times. We took him for a swallow study. It seemed that despite all of our efforts, his behavior was still the same. He was one miserable baby. I knew something wasn't right, but nobody seemed to have a good explanation as to what was wrong.
And then one day, he stopped nursing. Completely. Regardless of how hungry he was, he absolutely refused to nurse. (What kind of kid does that???) My husband and I were in no kind of financial situation to pay for formula on a regular basis, and since he had reflux, I felt like I had no other choice but to pump my milk. So I did. And then I bottle fed him. It was time consuming. So. Much. Work. But even bottle feeding was a struggle for him.
When he was almost 4 months old, we were referred to a gastrointestinal specialist and a feeding clinic. The feeding clinic helped us figure out the best way to feed him and taught us special techniques. And we were finally able to pinpoint his problem. Since he was a preterm baby, he didn't have his "suck-swallow-breathe" rhythm down. When you add reflux and his impatient personality, it results in a recipe for disaster. After multiple visits to the feeding clinic, he started to progress. His projectile vomiting stopped, the screaming and crying during feedings subsided, and he started to stay on a growth curve. Relief.
This was a hard time in my life. Probably one of the hardest. I was still exhausted and recovering from childbirth (yes, really). My baby was always fussy. I was struggling to maintain my milk supply because he didn't nurse well. And I knew that something was wrong. I felt like I had so many conflicts stacked up against me. People around me thought I was being dramatic. To them I was just a new mom who was struggling with a new baby. I had many well intentioned people give me advise, even when I wasn't looking for it. Many times I just needed a listening ear, or a bit of encouragement. Instead people would say, "Well, if you do _______that will fix his problems." They didn't know what it was like to have a baby who had a serious struggle with feeding. Their advise always seemed to be based on resolving normal baby conflicts. It only ended up making me feel more discouraged.
My purpose in writing this is not to gain sympathy, but to share my experience. I want to encourage other moms who have struggled or are struggling like this. It's hard when your child is going through a health issue that you can't seem to find the answer to. It's hard when nobody seems to understand what you and your family may be going through, yet everyone is so willing to hand out advice without fully comprehending your situation.
It's not easy going through something like this. If you find yourself in a situation here's a couple of thoughts to keep in mind:
- Life doesn't always go the way we plan or the way we want it to. When your expectations don't come into fruition, it doesn't mean you are a failure.
- Educate yourself on the specific issue as much as you can, and always ask questions. Don't give up and keep searching until you've found your answer.
- Above all else, "Trust in the Lord with all your heart and lean not on your own understanding; in all your ways submit to him, and he will make your paths straight." Proverbs 3:5-6. Seek God for direction.
And the next time a friend opens up about a conflict, remember to be quick to listen and slow to speak. Before offering advice, be sure to listen and make certain that they are truly asking for advice. Sometimes a person may just need a listening ear or just a little encouragement rather than advice.
Food for thought.
Sometimes, despite all the planning, life doesn't go the way you expect it to, you know? My older son's first year of life was like that. He was a hard baby. Very hard.
He was born at 37 weeks. Not a premature baby, but a preterm baby.
{Less than 12 hours old}
Because he was born a little early, he struggled with nursing. But we kept at it. Within the first couple of weeks, he started projectile vomiting. (I cannot tell you how may times I've been puked on). We also struggled to keep him on a growth curve. Any growth curve. He cried a LOT. He was hungry literally ALL the time, and he was always cranky. We visited lactation consultants. We had blood tests done. We tried a couple different antacids. I changed my diet several times. We took him for a swallow study. It seemed that despite all of our efforts, his behavior was still the same. He was one miserable baby. I knew something wasn't right, but nobody seemed to have a good explanation as to what was wrong.
{Preparing to do a swallow study at the hospital. Look at his tiny little hospital gown.}
And then one day, he stopped nursing. Completely. Regardless of how hungry he was, he absolutely refused to nurse. (What kind of kid does that???) My husband and I were in no kind of financial situation to pay for formula on a regular basis, and since he had reflux, I felt like I had no other choice but to pump my milk. So I did. And then I bottle fed him. It was time consuming. So. Much. Work. But even bottle feeding was a struggle for him.
When he was almost 4 months old, we were referred to a gastrointestinal specialist and a feeding clinic. The feeding clinic helped us figure out the best way to feed him and taught us special techniques. And we were finally able to pinpoint his problem. Since he was a preterm baby, he didn't have his "suck-swallow-breathe" rhythm down. When you add reflux and his impatient personality, it results in a recipe for disaster. After multiple visits to the feeding clinic, he started to progress. His projectile vomiting stopped, the screaming and crying during feedings subsided, and he started to stay on a growth curve. Relief.
This was a hard time in my life. Probably one of the hardest. I was still exhausted and recovering from childbirth (yes, really). My baby was always fussy. I was struggling to maintain my milk supply because he didn't nurse well. And I knew that something was wrong. I felt like I had so many conflicts stacked up against me. People around me thought I was being dramatic. To them I was just a new mom who was struggling with a new baby. I had many well intentioned people give me advise, even when I wasn't looking for it. Many times I just needed a listening ear, or a bit of encouragement. Instead people would say, "Well, if you do _______that will fix his problems." They didn't know what it was like to have a baby who had a serious struggle with feeding. Their advise always seemed to be based on resolving normal baby conflicts. It only ended up making me feel more discouraged.
My purpose in writing this is not to gain sympathy, but to share my experience. I want to encourage other moms who have struggled or are struggling like this. It's hard when your child is going through a health issue that you can't seem to find the answer to. It's hard when nobody seems to understand what you and your family may be going through, yet everyone is so willing to hand out advice without fully comprehending your situation.
{Over time his eating has improved}
- Life doesn't always go the way we plan or the way we want it to. When your expectations don't come into fruition, it doesn't mean you are a failure.
- Educate yourself on the specific issue as much as you can, and always ask questions. Don't give up and keep searching until you've found your answer.
- Above all else, "Trust in the Lord with all your heart and lean not on your own understanding; in all your ways submit to him, and he will make your paths straight." Proverbs 3:5-6. Seek God for direction.
And the next time a friend opens up about a conflict, remember to be quick to listen and slow to speak. Before offering advice, be sure to listen and make certain that they are truly asking for advice. Sometimes a person may just need a listening ear or just a little encouragement rather than advice.
Food for thought.
Labels:
acid,
encouragement,
everyday life,
experience,
health problems,
mom stuff,
reflux,
struggle
Thursday, September 5, 2013
Blueberry Protein Pancakes
Does anybody here like breakfast? I LOVE breakfast. If I could, I would eat it all day long for every meal. Well, maybe not. But I would definitely eat it more than once a day if I had the option.
So let's talk about pancakes. Who doesn't love a carb overload stack of warm pancakes, topped with melting butter and sweet syrup? The problem is that it's not so good when weight watching...and you may also feel like you've fallen into a permanent food comma after the pancake stack. Not my favorite feeling.
So here's a great alternative. These pancakes skip the starchy flour and rely mostly on bananas to sweeten. Friends, these are different. These pancakes are much more filling and so not starchy. These pancakes will not leave you hungry an hour after eating them. This. Is. Breakfast.
Blueberry Oatmeal Pancakes
1 1/2 cup Egg Beaters
1 mashed ripe banana
2 cups old fashioned oats dry
2 cups 2% cottage cheese
4 teaspoons sugar
2 teaspoons cinnamon
2 teaspoons vanilla extract
1 cup blueberries ( thawed if frozen or fresh if available - I prefer fresh)
In a blender, blend all ingredients except blueberries until smooth. Heat a griddle or large non-stick skillet over medium-low heat. Spray with non-stick cooking spray. For each pancake pour 1/4 cup of batter onto griddle and sprinkle slightly less than 1 tablespoon of blueberries on each pancake. Flip when they start to bubble. Cook until golden brown. Repeat with remaining batches, spraying the griddle as needed. Makes about 12 pancakes.
Have I convinced you yet? Are you ready to make them? Do it.
P.S. This recipe is from Shrinking on a Budget.
Labels:
blueberry,
breakfast,
filling,
food,
healthy,
low blood sugar,
low calorie,
pancakes,
recipe
Tuesday, September 3, 2013
3 Parenting Books that Have Made My Life Easier
I think that every parent gets to the point where they feel stuck on an issue with their child - Sleeping, Eating, Schedules, etc. So maybe a book will help, right? But there's so many, so how do you know what to choose? These three books have been unbelievably helpful to me over the past several years.
1. Healthy Sleep Habits, Happy Child by Marc Weissbluth
I wish I had known about this book when my older son was born. I had SO MUCH trouble getting him to sleep enough. He hated sleeping (still does). I had so many sleep battles with him when he was younger. But what I didn't know was how much I really didn't understand about sleep. Around my son's first birthday a friend recommended this book to me after a comment about his sleep deprivation. This book helped me correct his sleep issues. It explains how sleep works, why certain sleep issues to occur, and how to fix those problems. The knowledge from this book has helped me so much and my baby has much better sleep habits than my older son did at this age. We still encounter sleep issues from time to time, but it's so much easier to fix the problems now.


2. How to Get Your Kid to Eat: But Not Too Much by Ellyn Satter
We've had feeding battles with my older since...uhhh...birth. No lie. When it comes to eating, he can usually think of about 23,546 other things that he would rather do. It's not exactly that he hates food, but he just isn't that interested in eating (except chocolate). I suspect that the fact that he had projectile reflux as an infant has some sort of subconscious influence toward his food apathy. This was a huge issue for us when he was younger. I was constantly stressed about his food consumption. It wasn't something that I expressed too often, but it was always in the back of my mind. How to Get Your Kid to Eat But Not Too Much talks about strategies to teach your child to be a healthy eater. It discusses different problems that occur during different age groups as well and how to deal with them in a conflict free manner. After implementing these strategies, my husband and I were able to help our son to become a better eater. He is still a picky eater, but the food "battles" at the dinner table have diminished significantly. And we can always get him to at least try his food. (That never happened before the book). (This book was recommended by the occupational therapist that worked with my older son on his feeding issues as a baby AND the strategies in this book are also taught in WIC programs)


3. On Becoming Baby Wise: Giving Your Infant the Gift of Nighttime Sleep by Gary Ezzo and Robert Bucknam
I've used the Babywise strategies with both of my boys. Between 12 to 15 weeks of age both of them were sleeping 12 hour stretches at night...It may have been a little longer with my older son due to his projectile vomiting (good times). Babywise emphasizes the importance of establishing a consistent schedule with your baby which in turn allows flexibility when you aren't always able to maintain the schedule (aka grocery shopping day). I really love the wake/feed/play/sleep cycle that they teach in this book too. There are a few things that I'm not completely on board with, but overall, this is a great book that has helped us establish good habits.
I realize that these books and strategies aren't for everyone - especially when it comes to Babywise. It seems that even the mention of Babywise stirs up ill feelings in people. It's cool. Don't worry about it. I promise I won't think you are a bad parent if you choose to do things a different way from me. These books and strategies have helped us establish the environment that we are striving for in our specific family. Every family is unique in the way that they operate and the goals that they establish. But if you are looking for information, then these are the books I would recommend to start off with. :) What parenting books have you found helpful?
1. Healthy Sleep Habits, Happy Child
I wish I had known about this book when my older son was born. I had SO MUCH trouble getting him to sleep enough. He hated sleeping (still does). I had so many sleep battles with him when he was younger. But what I didn't know was how much I really didn't understand about sleep. Around my son's first birthday a friend recommended this book to me after a comment about his sleep deprivation. This book helped me correct his sleep issues. It explains how sleep works, why certain sleep issues to occur, and how to fix those problems. The knowledge from this book has helped me so much and my baby has much better sleep habits than my older son did at this age. We still encounter sleep issues from time to time, but it's so much easier to fix the problems now.

2. How to Get Your Kid to Eat: But Not Too Much
We've had feeding battles with my older since...uhhh...birth. No lie. When it comes to eating, he can usually think of about 23,546 other things that he would rather do. It's not exactly that he hates food, but he just isn't that interested in eating (except chocolate). I suspect that the fact that he had projectile reflux as an infant has some sort of subconscious influence toward his food apathy. This was a huge issue for us when he was younger. I was constantly stressed about his food consumption. It wasn't something that I expressed too often, but it was always in the back of my mind. How to Get Your Kid to Eat But Not Too Much talks about strategies to teach your child to be a healthy eater. It discusses different problems that occur during different age groups as well and how to deal with them in a conflict free manner. After implementing these strategies, my husband and I were able to help our son to become a better eater. He is still a picky eater, but the food "battles" at the dinner table have diminished significantly. And we can always get him to at least try his food. (That never happened before the book). (This book was recommended by the occupational therapist that worked with my older son on his feeding issues as a baby AND the strategies in this book are also taught in WIC programs)

3. On Becoming Baby Wise: Giving Your Infant the Gift of Nighttime Sleep
I've used the Babywise strategies with both of my boys. Between 12 to 15 weeks of age both of them were sleeping 12 hour stretches at night...It may have been a little longer with my older son due to his projectile vomiting (good times). Babywise emphasizes the importance of establishing a consistent schedule with your baby which in turn allows flexibility when you aren't always able to maintain the schedule (aka grocery shopping day). I really love the wake/feed/play/sleep cycle that they teach in this book too. There are a few things that I'm not completely on board with, but overall, this is a great book that has helped us establish good habits.
I realize that these books and strategies aren't for everyone - especially when it comes to Babywise. It seems that even the mention of Babywise stirs up ill feelings in people. It's cool. Don't worry about it. I promise I won't think you are a bad parent if you choose to do things a different way from me. These books and strategies have helped us establish the environment that we are striving for in our specific family. Every family is unique in the way that they operate and the goals that they establish. But if you are looking for information, then these are the books I would recommend to start off with. :) What parenting books have you found helpful?
Labels:
babies,
baby,
books,
children,
eating problems,
everyday life,
fatigue,
help,
parenting,
schedule,
sleep problems,
tired
Subscribe to:
Posts (Atom)


