So Here's My Life

The things we make,
the food we eat and
the shenanigans in between.

A blog about making things by
MICHELLE SEXTON

Showing posts with label mod podge. Show all posts

Tuesday, November 26, 2013

How to Make Glitter Heels - A DIY Tutorial

I cannot tell you how much I enjoy GLITTER. It's so sparkly, I just find it irresistible. Anybody else feel the same way? I know you do. Just admit it. Glitter is perfect for adding a little flare and it's an easy way to create a jewel-toned effect. Jewel tones are terrific for Holiday style, but also work well year-round, as long as you choose colors other than red or green. So, I upcycled a pair of lonely stilettos from my closet and I used glitter. I had so much fun, I could hardly contain my excitement as I waited for them to dry.

Glitter heels tutorial

These black stilettos have been sitting in my closet. Although I love them, I never wear them - mainly because I wear sandals for warm weather and boots for cooler weather. So, as cute as they are by themselves, I like to upcycle my clothing and accessories into more useful items. Basically what I am saying is that I have to bribe myself into wearing some items by making them more exciting. My first idea was to cover them with fabric, but after a test run I decided it was a little too 1980's-matronly. Then, I considered doing a paper collage over them, but then realized that it wasn't the look I was going for. So, I finally decided on glitter - and just to let you know, I am SO pleased with how they turned out. I cannot wait to wear these!

Supplies needed:
- a pair of heels
- masking tape
- glitter
- Mod Podge
- sponge brush

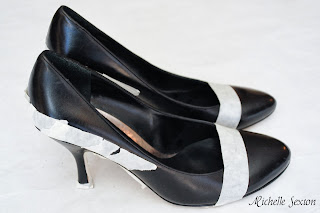
use masking tape to create a border

tape the soles

Start out by taping the edges of the heels to create a border - specifically the parts that you do not want decorated. (The soles, and the main part of the shoes)

cover toes with mod podge

Using a sponge brush, cover toes and heels with Mod Podge.

cover thoroughly with glitter

add glitter to heels and toes

heels covered with glitter

Cover thoroughly with glitter and allow to dry for several hours.

cover glitter with mod podge

Once dry, apply a second coat of Mod Podge over the glitter. Gently peel tape off of shoes once the Mod Podge is set (not drippy), but not completely dry. (I waited until the second coat of Mod Podge was completely dry before I peeled off the tape. Because of this, it was difficult to peel the tape off the shoes without pulling off the rest of the Mod Podge. I ended up using an X-acto knife to separate the glue from the tape). Be very careful to not touch the glitter. Allow to finish drying overnight.

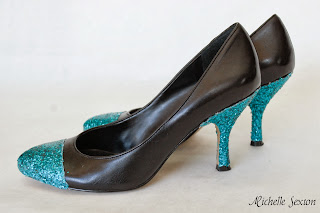
glitter heels diy

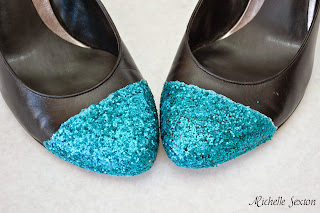
heels with glitter on toes

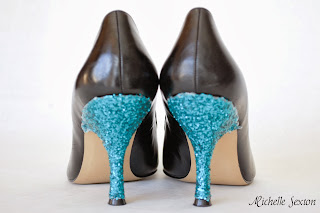
glitter covered heels

Wear them and amaze all your peers with your crafty talent.
What is your glitter color preference?

Liked this post? Keep updated on new posts by email.

Thursday, October 10, 2013

Eyeball Candle Holder Jars

I'm not a huge fan of Halloween. I don't like creepy things, but Mac has 3 Halloween shirts. And we made this eyeball jar the other day. So, maybe I am contradicting myself? Perhaps.

Eyeball Jars on display from a preschool project

A couple of days ago, Mac and I made eyeball candle holder jars. They were pretty fun. Other than getting his fingers sticky, he loved making them. It's a quick and easy project for a four-year old. And it uses lots of eyeballs. How cool is that?

After Mac finished his eyeball jar, he proudly carried it around the house for the next couple of days (without a candle, of course). He was disappointed when I told him he couldn't drink out of it. He also repeatedly showed his younger brother, "Look! An eyeball jar!" Cheese had no idea what he was looking at. Mac was even planning on taking it to school for Show 'N Tell, but changed his mind at the last minute.

Anyway, this was fun for the both of us to do. And here's how we did it:

Supplies needed:
- jar
- orange tissue paper
- Mod Podge
- sponge brush
- a package of wiggle eyes

tissue paper crumpling by a preschooler
Start by crumpling your tissue paper to give a wrinkled look.

preschooler tearing tissue paper
Tear the tissue paper into strips. Ours were about 6 inches long and 1 inch wide.

preschooler painting glue
Using the sponge brush and the Mod Podge, cover approximately 1/4 of the jar.

preschool child adding tissue paper
Press the tissue paper strips on top of the wet Mod Podge. Continue painting Mod Podge in sections and covering with tissue paper until the entire jar is covered.

child adding glue
Once the jar is covered, do a second coat of Mod Podge, and cover with an additional layer of tissue paper. Continue with the second coat until the entire jar is covered.

child adding eyes to a jar
Paint a section of the jar with Mod Podge, and stick on the wiggle eyes however your heart desires.

preschool boy admiring craft
Once you have finished sticking on the eyes, allow to dry for about 10 minutes or so. (It doesn't need to be completely dry). Paint one more coat of Mod Podge over the entire jar including the eyes. Be sure to paint in the crevices between the eyes to keep them from falling off after it dries. Allow it to dry for several hours.

Eyeball jars with candles
 A couple of tips:
-When painting over the eyes, make sure to use long brush strokes instead of blotting on the Mod Podge. Blotting creates tiny bubbles that will dry in the Mod Podge, which create a whitish film over the eyes.
-Instead of tearing strips of tissue paper, consider tearing tissue paper into 1 inch squares. This will probably be a little easier to arrange on the jar. I didn't think about this until after we finished.

glowing eyeball jars for Halloween


Keeping It Simple


nap-time creations

Thursday, September 26, 2013

Mounted Instagram Photos

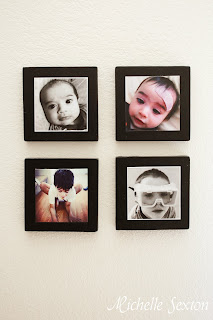
One. More. Instagram. Project. This is a fun one. What am I saying? They're all fun! But I think this one is my favorite. If you haven't seen the other two, you can find them here and here.

I have a couple of favorite photos. Photos that stand out for one reason or another. A funny moment. A cute expression. A personality trait captured. This project is for the extra-special ones. The ones worth framing. The ones you don't mind seeing day after day. This is the perfect way to preserve those special memories and display them for everyone else to see. Good memories.

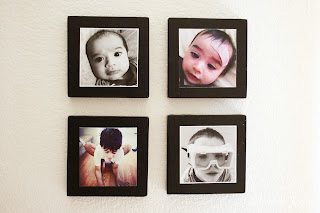
Mounted Instagram Photos

side view of mounted Instagram Photos

Here's the supplies you need:
- 1x6 board
- 4x4 size Instagram photos
- Mod Podge Matte finish
- black spray paint (Satin finish)
- sponge brush or paint brush
- ruler
- drill (don't be scared. you only need to drill a small hole)
- handheld electric sander or sandpaper

Before we get started, lets talk about lumber. Originally I had the idea to mount an Instagram photo onto a 2x4. Good idea, right? Not so much. When I placed the photo over a 2x4, the photo was actually larger than the plank. So after this, my husband explained that lumber is not actually true to size. A 2x4 is actually 1 1/2 x 3 1/2 inches, so a 2x4 won't work. Instead I chose to use a 1x6 (which is actually measures 3/4 x 5 1/2 inches). Make sense?

So start by cutting the1x6 into four 5 1/2 x 5 1/2 inch squares. (Often times you can ask them to cut them for you at the hardware store when you purchase the lumber). My husband taught me how to work the table saw for this project, so I am proud to say that I cut these blocks myself...but I was  terrified as I was running the table saw.

sanded uncured wood blocks
Using sandpaper or electric sander, smooth out the sharp edges and corners to create a softer look.

black painted wood blocks
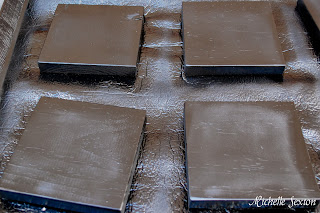
Spray paint the top and each side of the block. (I promise the blocks are actually painted black. The lighting was so weird when I took pictures of them.)

instagram photo with mod podge painted over it.
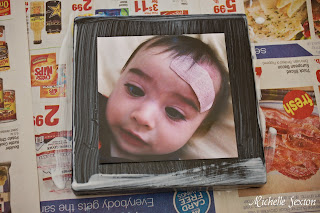
Using Mod Podge, paint both the top and each side of the block and place your photo in the center of the block.

black and white instagram photo with Mod Podge
Allow to dry, and paint a couple additional layers of Mod Podge over the photo to seal and protect it. (This will not destroy the integrity of the photo).

permanent marker dot on wood
Once it's completely dry, flip the block over to the backside and mark a spot 3/4 of inch below the top edge and centered (2 3/4 inches across). Next paint a layer of Mod Podge over the back side of the block for added protection (and to keep any paint that may of leaked onto the backside from rubbing off on your wall when you hang these up).

Drill a hole (deep enough to hang from a nail) into the mark you made on the back of the block. Be careful to not to drill all the way through. This was my first experience using a drill (for real) so I did a couple of practice drills on a piece of scrap wood before I attempted to drill a nail hole in my Instagram blocks.

mounted instagram photo display
Wa-la! The hardest part of this project is finding the perfect place in your house to display these terrific photos. Well, maybe that's just my dilemma...

Here's a couple of tips:
- After you place the photo on top of the first layer of Mod Podge, I recommend placing some small and weighted on top of the photo around the edges to keep the photo from curling up as it dries.
- The wood block stuck to the newspaper as a result of dripping excess Mod Podge after it dried. Use a knife or box cutter to carefully scrape off the extra Mod Podge.
- After sanding down the edges, I strongly recommend a thorough wipe down of each block to prevent sawdust on your block as the project progresses. The same goes for after your spray paint it.

This was such a fun project for me that I want to do it again. I'm also going to mount the boys' sonogram pictures with their names underneath. I'm also thinking of finding some photos to decorate our downstairs bathroom, which is nothing but an empty white room. There are so many possibilities with this project. 

Enjoy, friends!