So Here's My Life

The things we make,
the food we eat and
the shenanigans in between.

A blog about making things by
MICHELLE SEXTON

Showing posts with label instagram. Show all posts

Tuesday, October 13, 2015

Instagram Is Where It's At!

Hey There!

I know....it's been a while. This past year has been crazy. Crazy. The good news is that I'm still alive. {If you follow me on Instagram, you've probably noticed.} I've come a long way health-wise since the last time I've posted. I am well rested and not sleep deprived. Always a good thing, right?


I've also learned a lot about priorities during the past year and discovered a couple of things along the way. Staying at home with kids, managing your home, AND doing a good job blogging consistently about making things takes way more time than I have right now. While I was blogging, I was constantly struggling to effectively manage each of those aspects, and was never able to do each of those things to the fullest. No matter how hard I tried, something always fell to the wayside. I ended up giving myself some major anxiety over this. Finally one day I realized, I don't have to do it all. I'm not a bad person if I don't. I'm not a failure either. And then I prioritized my commitments. Blogging came in behind my family and managing my home.


So what am I saying? I'm not telling you that I'm quitting my blog. That's not my plan. It's more that I don't plan on blogging much until I have both kids in school. Life is just too hectic when you have at least one little hooligan at home to take care of. So I may pop in here and there and share a project with you that I'm working on, but for the most part, blogging has been tabled to spend more time with my kids while they are home. They're only little once, right? These years are precious!


Even though I'm not blogging, I'm still around and still doing crafty things. You can still find me on Instagram. I love to share the creative projects I'm working on, colorful photos, and the things I draw inspiration from. The photos in this post are some of my favorite recent colorful photos from my Instagram account.


So let's not say goodbye. Instead let's just say,"See you later!" And in the meantime, let's keep in touch through Instagram!

Come say hi!

Thursday, September 26, 2013

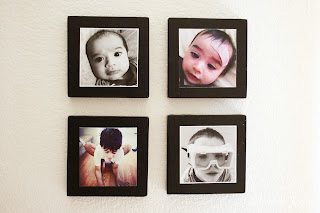
Mounted Instagram Photos

One. More. Instagram. Project. This is a fun one. What am I saying? They're all fun! But I think this one is my favorite. If you haven't seen the other two, you can find them here and here.

I have a couple of favorite photos. Photos that stand out for one reason or another. A funny moment. A cute expression. A personality trait captured. This project is for the extra-special ones. The ones worth framing. The ones you don't mind seeing day after day. This is the perfect way to preserve those special memories and display them for everyone else to see. Good memories.

Mounted Instagram Photos

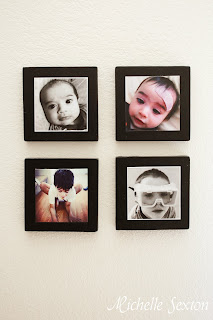
side view of mounted Instagram Photos

Here's the supplies you need:
- 1x6 board
- 4x4 size Instagram photos
- Mod Podge Matte finish
- black spray paint (Satin finish)
- sponge brush or paint brush
- ruler
- drill (don't be scared. you only need to drill a small hole)
- handheld electric sander or sandpaper

Before we get started, lets talk about lumber. Originally I had the idea to mount an Instagram photo onto a 2x4. Good idea, right? Not so much. When I placed the photo over a 2x4, the photo was actually larger than the plank. So after this, my husband explained that lumber is not actually true to size. A 2x4 is actually 1 1/2 x 3 1/2 inches, so a 2x4 won't work. Instead I chose to use a 1x6 (which is actually measures 3/4 x 5 1/2 inches). Make sense?

So start by cutting the1x6 into four 5 1/2 x 5 1/2 inch squares. (Often times you can ask them to cut them for you at the hardware store when you purchase the lumber). My husband taught me how to work the table saw for this project, so I am proud to say that I cut these blocks myself...but I was  terrified as I was running the table saw.

sanded uncured wood blocks
Using sandpaper or electric sander, smooth out the sharp edges and corners to create a softer look.

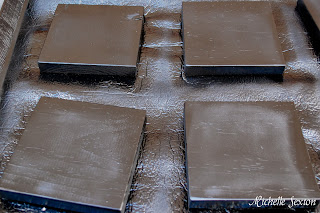
black painted wood blocks
Spray paint the top and each side of the block. (I promise the blocks are actually painted black. The lighting was so weird when I took pictures of them.)

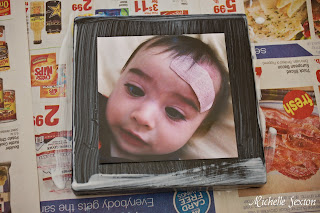
instagram photo with mod podge painted over it.
Using Mod Podge, paint both the top and each side of the block and place your photo in the center of the block.

black and white instagram photo with Mod Podge
Allow to dry, and paint a couple additional layers of Mod Podge over the photo to seal and protect it. (This will not destroy the integrity of the photo).

permanent marker dot on wood
Once it's completely dry, flip the block over to the backside and mark a spot 3/4 of inch below the top edge and centered (2 3/4 inches across). Next paint a layer of Mod Podge over the back side of the block for added protection (and to keep any paint that may of leaked onto the backside from rubbing off on your wall when you hang these up).

Drill a hole (deep enough to hang from a nail) into the mark you made on the back of the block. Be careful to not to drill all the way through. This was my first experience using a drill (for real) so I did a couple of practice drills on a piece of scrap wood before I attempted to drill a nail hole in my Instagram blocks.

mounted instagram photo display
Wa-la! The hardest part of this project is finding the perfect place in your house to display these terrific photos. Well, maybe that's just my dilemma...

Here's a couple of tips:
- After you place the photo on top of the first layer of Mod Podge, I recommend placing some small and weighted on top of the photo around the edges to keep the photo from curling up as it dries.
- The wood block stuck to the newspaper as a result of dripping excess Mod Podge after it dried. Use a knife or box cutter to carefully scrape off the extra Mod Podge.
- After sanding down the edges, I strongly recommend a thorough wipe down of each block to prevent sawdust on your block as the project progresses. The same goes for after your spray paint it.

This was such a fun project for me that I want to do it again. I'm also going to mount the boys' sonogram pictures with their names underneath. I'm also thinking of finding some photos to decorate our downstairs bathroom, which is nothing but an empty white room. There are so many possibilities with this project. 

Enjoy, friends!

Thursday, September 12, 2013

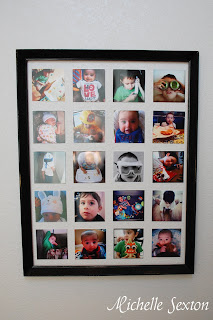
Fake Framed Instagram Grid

So many photos and not enough ways to display them? Wait no more, friends. Behold, I bring you another Instagram project! Rejoice.
fake framed instagram grid

This photo grid is a fun take on those classic framed photo collages that everyone seemed to have in their house when they were growing up. You know the kind with matte cut-outs in circles, squares, and rectangles? That was so 20 years ago..oh wait...you didn't have one in your house? Never mind. Apparently it was just my house. ;)

Anyway, lets just skip the awkward matte cut out shapes and tape them straight to the wall. Why not?

Supplies Needed:
- Instagram Photos (I used 20 photos, 4x4 size)
- empty frame (without backing or glass)
- masking tape
- nail
- hammer
- bubble level

I made this collage by starting at the top left corner, working my way across from left to right and then moving down.

Choose a spot on the wall to begin your collage and mark it with a pencil

mark the wall at your starting point

Add masking tape to the back of the first picture and place it over the marked spot on the wall.

Using a bubble level, check to see that the photo is straight, vertically and horizontally. (This step is important - an empty frame will not hang properly over a crooked photo grid.)

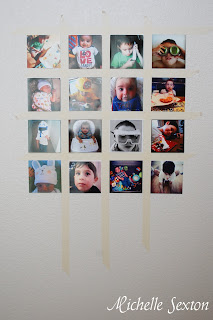
Once the photo is straight, tear two long strips of masking tape. Place one strip above the photo, and the other strip to the right side of the photo, making a "T" shape. The edges of the tape should fit snugly against the photo. Check each tape strip with a leveler to assure straight lines. Adjust tape if necessary. The masking tape creates a temporary border around the photos to assist with even spacing and straight lines.

begining of instagram grid

Place another photo against the edge of right side of the vertical tape strip, as pictured above. Be sure that the top edge of the photo lines up with the horizontal tape strip above as well. Add another strip of tape against the right edge of the second photo. Be sure that tape strips are straight. Place another photo.

Repeat the photo/tape strips until you have completed the first row of photos.

To begin a new row, place a long strip of tape below the first row of photos. Add a photo below each photo in the first row.

masking tape and instagram photos

Every so often, use the level to double-check the straightness of the grid. Make adjustments, if necessary. 

lining up instagram photos

As the grid progresses, the photos will be easier to place without double checking the straightness.

instagram photo arragement

Once you finish, depending on the number of photos used, the photo grid will look something like this:

arranging instagram photos with masking tape

At this point I know you are super-anxious to rip off those tape strips, but there's a couple more important steps to do.

Hammer a nail into the wall above the photo grid at the center. (check your frame to see how your frame hangs. I didn't use any measurements here. I just "eyeballed" it.)

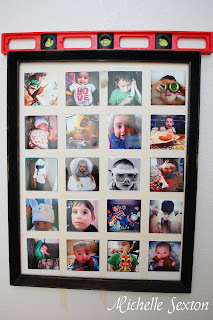
Hang the frame over the taped photo grid and place the leveler on top of the frame. Adjust the frame so that it hangs evenly over your photo grid. If the frame is level and the grid somehow isn't, pull off the frame, and adjust pictures until level. Re-hang the frame and check again. (If you checked the straightness of the photos throughout the taping process, the grid should come out even.)

fake framed instagram grid

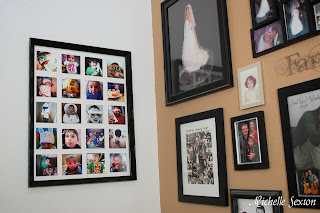
Once you are happy with frame over the photo grid, pull off that tape, and stand back to admire your handiwork.

wall with pictures framed

Not too hard, right?

Here's a couple of tips -
- I would recommend trying a shaped grid inside of the frame, like maybe an "x" or even a heart. However, since I literally ordered 87 Instagram photos, I wanted to use as many photos in this grid as possible, which is why I chose the ever-so-standard rectangle shape.
- This project takes a small amount of patience, but not too much. The best way to get straight and even photos is to start with the first photo you place. Make sure it's level, both vertically and horizontally. If this photo is not straight, the rest of the grid will come out crooked.

I have one more fun Instagram project coming soon. Pretty sure this next one is one of my favorites.


Friday, August 30, 2013

Hanging Instagram Wall Display

So Instagram. Huge Fan. Probably one of my favorite social media networks these days. Well, ok - it IS my favorite. Taking photos is definitely my thing. So when Instagram became available for Android users a couple of years ago, I was all over it. I had been super jealous of all those iPhone users with Instagram.

But after a while I realized I had a problem - so many photos, and no where to display them!  What to do?
 
Solution:
 

Ta-da! Fun solution, inspired by Pinterest pins. And a great way to fill empty wall space. Plus it's cheap and easy! What more could you ask for?

Here's how I did it:


Supplies:
- Instagram photos (as many as you want - I used 27 4x4 photos)
- twine
- 3/8" binder clips
- 6 flat-head nails (not pictured)
- hammer (not pictured)
- ruler or tape measure (not pictured)
- hot glue gun & glue sticks (not pictured)
- leveler (optional)

Start by nailing 3 nails 7 inches apart in a vertical line. (I recommend using a leveler to make sure the nails are in a straight line.)


Next, measure 63 inches across from the top nail of your vertical nail line and hammer an additional nail. Now, add two more nails below, 7 inches apart to complete a second vertical line of nails.


Starting at the top left nail, tie a square knot around the nail with the twine. Stretch the twine across to the opposite end, loop twine completely around the nail in one circle. Pull twine down and loop around the nail directly below. Be sure to keep twine tight as you wrap around each nail.


Stretch twine across to nail on the opposite end, and loop around again. Pull tight, pull twine down, and loop around nail below.


Pull twine tight and stretch it across to the nail on the opposite side. Tie a square knot around nail and trim excess twine.


Now hang up those awesome Instagram photos you've acquired with the binder clips!


A couple of tips:
 - Keep the twine tight as you loop it around each nail. It's best if you re-tighten after each loop. This project is doable by yourself, but it's easier if you have someone else to help you so they can hold the twine tight as you loop and tie knots.
- A leveler is not necessary, but very helpful to assure that everything ends up straight.
- I used the Walgreens app to print out my photos. The frames around some of the photos were not evenly trimmed. I think next time I get photos printed, I'll order them in 4x6's instead and trim them myself. Or use another printing company. Any suggestions? 
- I found it hard to make the knots tight in the place I wanted with the twine, so I ended up using a dab of hot glue behind the knots to secure them to the wall to make sure they stayed put.


I ended up printing 87 photos. Yes, I really did. So I have a couple more Instagram projects up my sleeve. I'll share them soon...once I finish them.

Liked the post? Let me notify you of new posts. Don't worry, I hate SPAM and won't abuse your email address. :)