So Here's My Life

The things we make,
the food we eat and
the shenanigans in between.

A blog about making things by
MICHELLE SEXTON

Showing posts with label upcycle clothing. Show all posts

Tuesday, February 4, 2014

Easy Upcycled Sweater Vest Tutorial

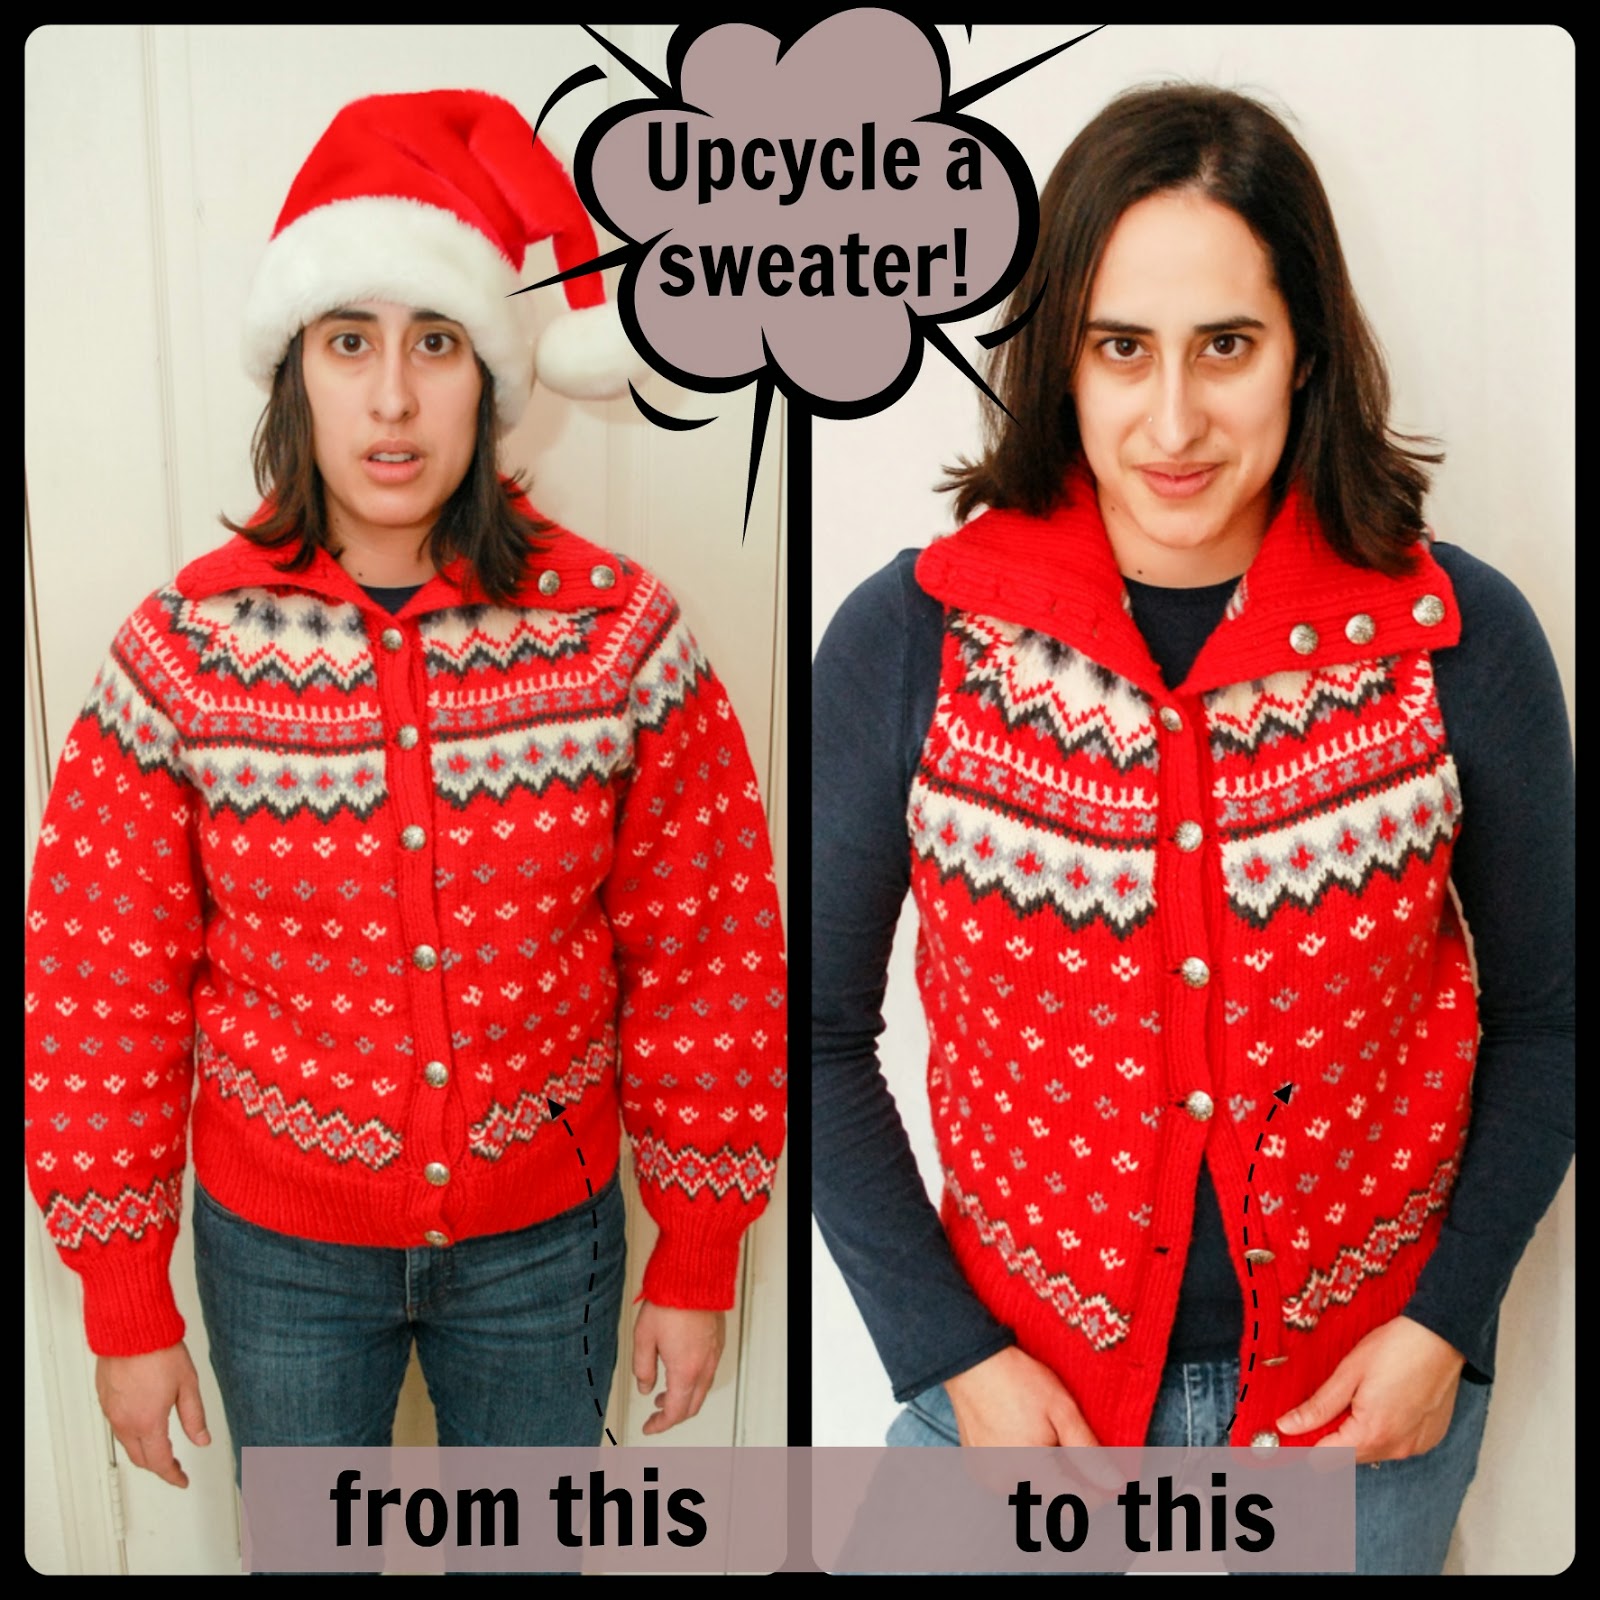
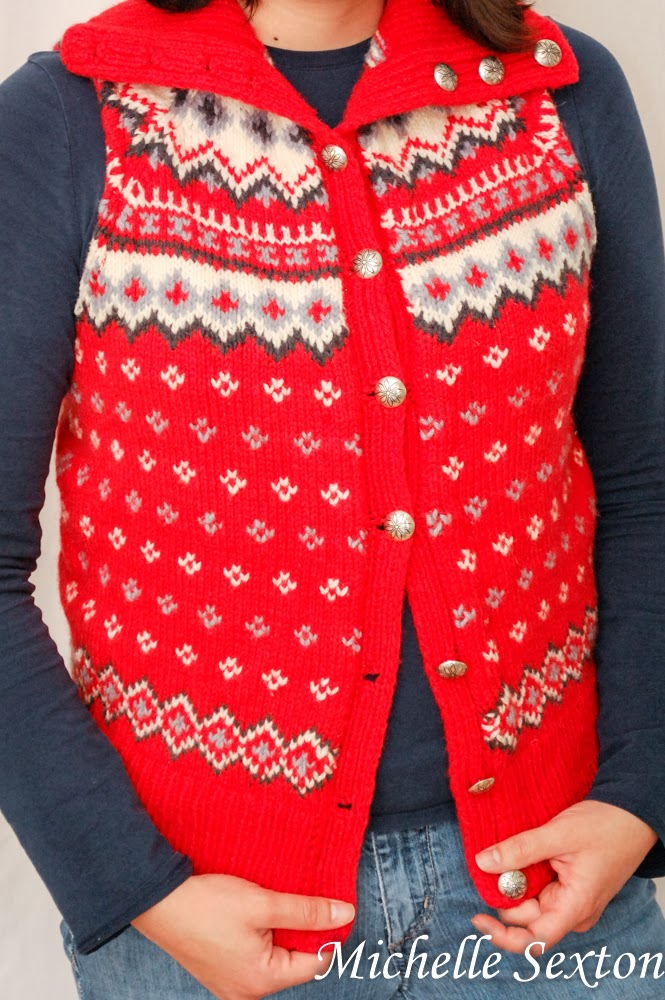
Did you know that upcycling is one of my favorite things to do? You didn't? Well, now you do. I get a great amount of satisfaction in converting an unwanted article of clothing into something new and different. It's just so much fun. I've had this sweater in the back of my closet for a while, begging to be changed into something else. It needed to be upcycled. Rest assured, I never actually wore this sweater until after I upcycled it. (I heard those sighs of relief. Yeah.) This hand-knit sweater from Norway was truly a diamond in the rough with its Fair Isle pattern, beautifully crafted buttons, and amazing fold-over collar, but it was hard to appreciate it's beauty. So, I gave this sweater a small make-over and turned it into a sweet sweater vest. When I wear it now, I pretend I live in Maine...because, somehow, Maine seems exotic to a person who has lived in the desert for most of her life. And in my mind, people in Maine wear sweater vests like this. Don't be offended.

Easy Upcycled Sweater Vest Tutorial - click through and learn how to make one.

A couple of years ago, I bought several clothing articles from a second hand store. It was one of those sales where you stuff as many items into a bag as possible and only pay 25 cents per bag. It was awesome. I found this awesome red sweater at that sale too. When I first found it, I was like, "Oh...wow...that's...loud," and then I put it back and continued sifting through the clothing piles. But, I couldn't get that sweater out of my head. Sure, it was loud, and even a bit eccentric, but the more I thought about it, the more I realized I actually liked this sweater. Not as it was, but I knew it had potential. So, I stuffed it in my bag, purchased it and brought it home. Little did I know, that at that time, I was pregnant with our second kid. (Pregnancy is not kind to me, and I have a very limited amount of creativity during this time. The only desire I have during these moments is to lay face down the couch with a trash can nearby, for puking, until my due date arrives.) A few days later, I found out I was pregnant. All plans to revamp this sweater were forgotten about until recently, when I switched out my seasonal clothes and came across this sweater. After casually considering my options for a month or two, I finally decided this eccentric sweater would be so much more awesome and a lot less crazy if it didn't have those frumpy, baggy sleeves. So, I got rid of them and now it's an awesome sweater vest and, currently, my favorite thing to wear. (I try not to wear it everyday because people might start to think that I don't wash my clothes.) ;)

Upcycle a frumpy sweater like this into something better - click through and see how
Before the upcycle

Before I start, let me just tell you, I am not a sewing expert in any way, shape, or form. I know how to work a sewing machine (uhh...mostly...or I can read the manual) and I can sew a straight line, but that's about it. This is an easy project, so don't get intimated if your seamstress skills are lacking. If I can do this project, you can too, provided that you can work a sewing machine...at least a little bit. :)

Ok. Project time.

Serge the sleeves before trimming

serge close up - upcycle a sweater
A closer look at the serged sleeve. Hard to see due to the fact that the thread is also red.

Start out by serging the top and bottom portion of the sleeves in a straight line, just above the armpit (pictured above) to prevent the sweater from unraveling once it's trimmed. Repeat the serge on the opposite sleeve, as well.

trim the sleeves of the sweater - upcycle a sweater

Once you have serged both sleeves, cut off both the sleeves below the serged line. (Side note: I recommend saving the sleeves to upcycle into something else - like maybe these awesome leg warmer/mock boot socks)

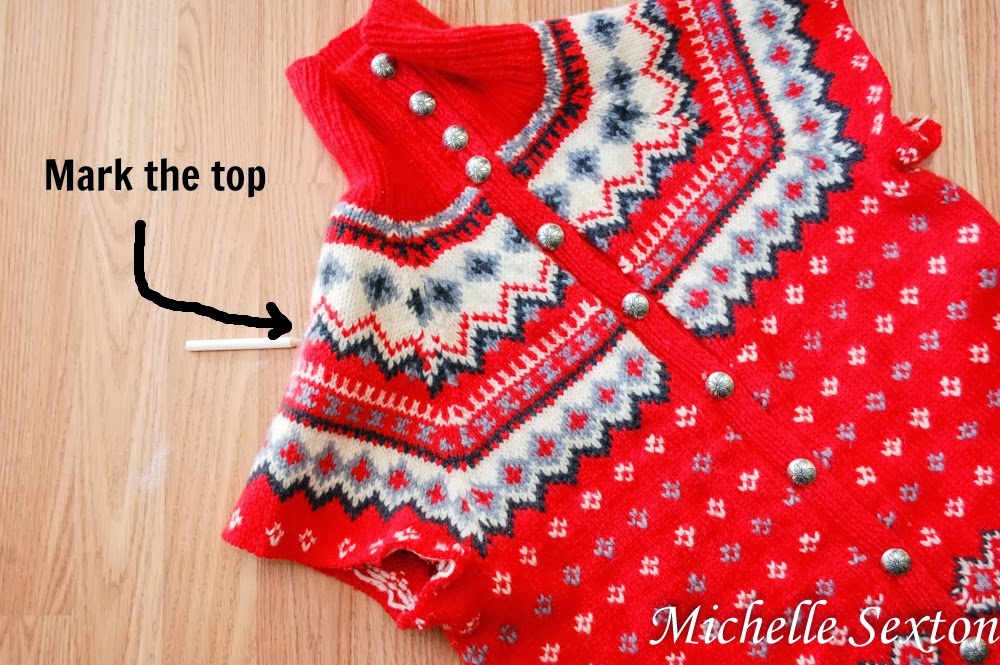
Mark the top of the sweater - upcycle a sweater!

Once the sleeves have been cut off, decide where you would like the top of the vest to end on your shoulder, and mark it.

Draw a path to make the arm cutouts - how to upcycle a sweater

Draw a rounded path on the top portion of the sleeve from the top of the marked shoulder to the bottom near the armpit.

serge along the arm cut out path - how to upcycle a sweater

Serge along the outside of the drawn path on the top portion of the sleeve only. Trim away the top part of the sleeve (after the top has been serged). Using the path made from the top part of the sleeve that has been cut away, trace the sleeve path onto the bottom half of the sleeve, serge, and then trim. (Be sure to connect the serge lines from the top portion to the bottom portion.)

fold the sweater in half to trace the arm cutouts - upcycle a sweater

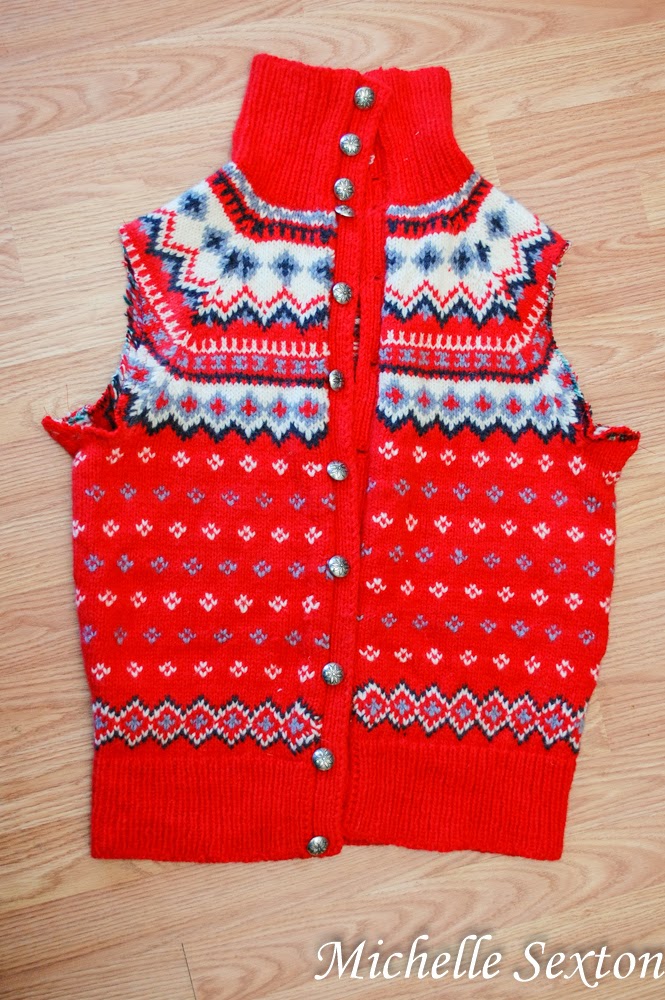
Once the top and bottom of the first side of the sweater have been serged and trimmed, fold the sweater in half and trace the sleeve path onto the top portion of the opposite side of the sweater. Serge the top portion of the sleeve, cut away the excess, retraced the path onto the bottom portion of the sleeve, serge, and trim again. 

how to upcycle a sweater!

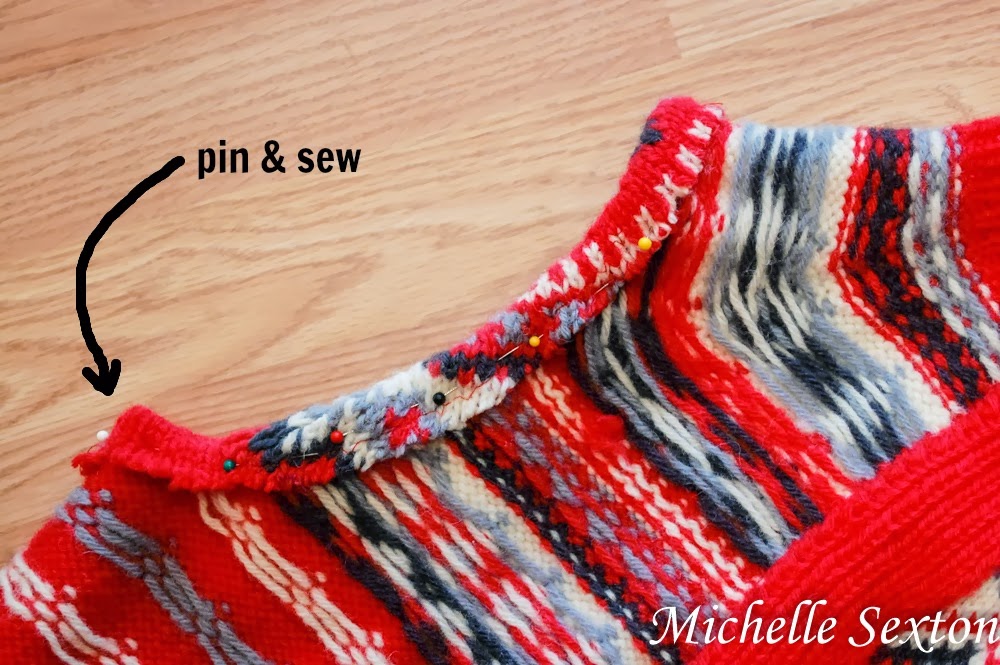
pin and sew the raw edges - upcycle a sweater!

Turn the sweater inside out, pin the raw edges, and sew a straight stitch along the edges. Trim the excess thread, turn inside out, and wear! 

How to Upcycle a Sweater - Click through and learn how

Easy way to upcycle a sweater into a vest - click through and learn how

I'm so pleased with how this turned out and it allows me to indulge in my Maine fantasy. Did you know I live on the coast and have a boat dock at the edge of my yard? I like to wear this sweater vest while I sit on the dock, sip the cappuccino in my mug, and watch the fishing boats off in the distance. Well, maybe not, but I can always pretend. (This sweater vest makes it all possible.)

easy upcycled sweater vest tutorial - click through and see how easy it is.

And look - the collar is still just as awesome as it was before. 

how to upcycle a sweater into a vest - click through and learn how

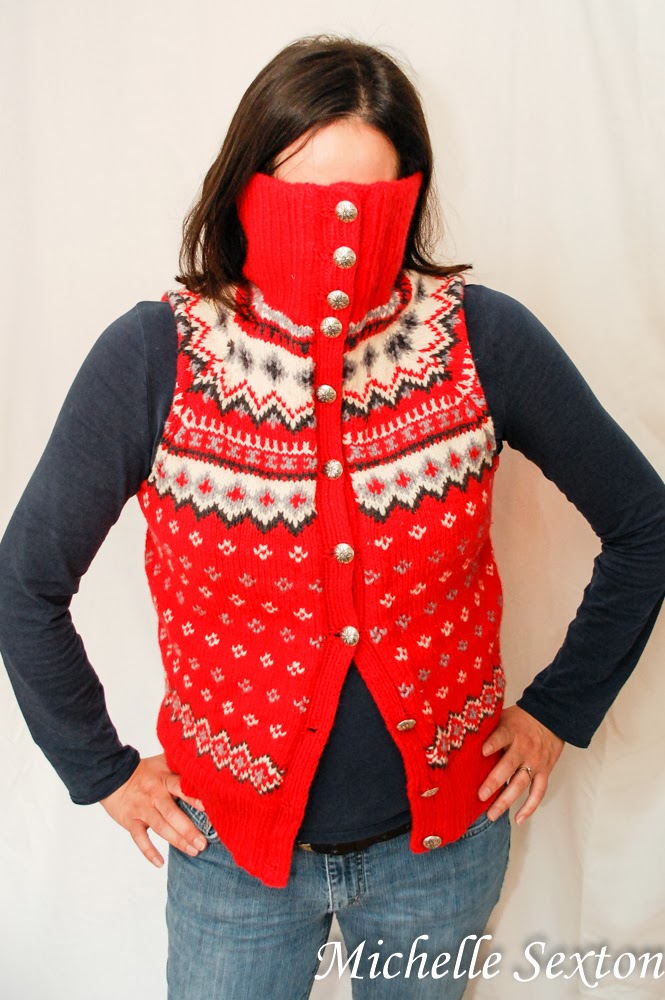
If it gets really cold, I can wear the sweater like this. Will you still be my friend if I wear it like this? ;) Go and make a vest for yourself now!

Tuesday, March 6, 2012

Denim Inspiration

This by far, was my favorite DIY clothing project, as well as my favorite pair of jeans. Unfortunately, they are a size 2 and I haven't worn a size for at least 5 years. I'm pretty sure that my size 2 days have come and gone, especially after pregnancy. 

I actually decorated these jeans about 5 years ago, before The Toddler was even a thought in our minds and my hips were a size 2. (And no, I did not look like I was anorexic or unhealthy as a size 2 either...just in case you were wondering...I'm just sayin')  ;)

I really have a thing for buttons. Honestly, my favorite way to decorate apparel is with buttons. I love to place random colored buttons all over an article of clothing. Several years ago I bought a large bag of buttons at an antique store. I had no idea what I would use them for, but I found the various shapes and brilliant colors completely inspiring. After I bought them, I would empty them all out and admire their uniqueness...wait...why am I telling you guys about this? Pretend you didn't read that last sentence. ANYWAY, all that to say, I LOVE buttons. You can check out a couple of my other button projects here and here.


Here's a couple of close-up shots to give you an idea of how I decorated them.


It was an easy and fun project, but a little more on the time consuming side. I think I remember spending close to 8 hours hand-stitching the buttons and embroidering patterns on this project. The thing that made it so time consuming, was that I changed thread colors so often. But it was definitely time well spent. :)


I miss wearing these jeans, not being a size 2, just wearing these jeans. I think I need to up-cycle these jeans into something else. Any suggestions?

By the way, I have at least one more button project up my sleeve...at least for now.
But I am making the effort to keep my button obsession at bay. ;)

Sunday, February 19, 2012

DIY T-shirt Headband

Headbands are pretty much the most useful accessory for moms. You can wear one just for fun, but they are also great for those days when you have to run out of the house without a shower. (I hate those days) Since you have on such a cute headband, no one will even notice that your hair is unwashed!


In my previous blog post, I talked about a blogger's gift exchange I participated in. If you clicked over to Megan's page, the blogger I got matched up with, you saw that I made her a headband. I made this headband from a T-shirt sleeve, and took less than an hour. Here's how I did it:

I found this t-shirt at a flea market in the fall. A vendor was selling a bunch of t-shirts for $1 each. So I snagged an XXL sized one, with the intention to use it for an undetermined future project.


Start by cutting off the sleeve of the T-shirt.

Determine the desired width of the headband, and trim off the excess fabric. But keep in mind that you want to leave a little extra for sewing and hemming the raw side. I wanted mine to be about an inch wide, so I gave myself an additional inch of fabric to work with.

Next, serge the raw edge of the T-shirt. (Actually in retrospect, you can probably skip this step, because t-shirt material typically doesn't unravel...didn't think about that until now. Duh)


Next turn the sleeve inside out, fold over the trimmed side, pin it, and sew it.

Then, to hide the unfinished edge, while the sleeve is still inside out, fold over the sewn edge, pin it, and sew it one more time to give it a more finished look.

Your headband should look something like the one pictured above. Then stitch a decorative line down the opposite side of the headband (The side that you didn't sew yet).


Once you have finished, add some cute accessories, like buttons. (it just so happens that I LOVE buttons. It's my secret obsession) I hand stitched these on, but if you are feeling super lazy, you could always use hot glue!

Done! Quick & Easy.
:)
I Heart Nap Time Today's Creative Blog

Thursday, February 9, 2012

The Upcycled Sweater Series Part 5 - Sweater into a Skirt Tutorial

Today is the last part of the series, and it's also my favorite project out of all the sweater projects that I've done. Be sure to catch up if you haven't read Parts 1-4. Part 1 was a tutorial on leg warmers. Part 2 was about making mittens and a scarf. In Part 3 you can learn how to make arm warmers, and Part 4 you can learn to make an infinity scarf, and a sweater vest.


For the last project, I made skirts from mens sweaters...

I used the arms from both of the sweaters to make leg warmers in Part 1. To start out, cut apart the sweater's shoulders (after the arms have been cut off).
This sweater was a men's size large. I wanted to use the bottom of the sweater (the part that sits at the waist), as the waist for my skirt. However, as it was, it was too large to fit snugly around my waist (fortunately!).  Start by measuring your waist or the place where you want the top of the skirt to fit. Subtract 3 inches from your waist measurement. Then, divide that number in half and use that number to mark off where to cut the waistline. For example: If my waist is 25 inches (it's not), then I subtract 3 and end up with 22 inches. From there I divide 22 in half and end up with 11. So that means I need to mark off a waistline that is only 11 inches long when the sweater is laying down (and trim off the excess fabric outside of the marked off waistline).

I used chalk to mark my sweater. Also, make sure that you turn the sweater inside out before marking, pinning, cutting, and sewing!
After marking off the waist on your skirt, use a yard stick or a straight surface to mark the outline of the sides for the skirt. (I don't have a yard stick, so I used a scrap board instead.)
 My mom helped me. These are her hands, btw.
Then pin along the marked part of your fabric, cut about an inch outside the marked line, serge the ends, and then sew along the marked edges. (This is always a challenge for me. Seriously, I have the hardest time sewing in a straight line!) Repeat on the opposite side.

Almost done. After deciding on the length of the skirt, trim the bottom giving yourself about an inch or two to work with. Serge the bottom, fold up the fabric to where you would like the hem to be, pin it, and hem by hand (blah) to avoid stretching the fabric in weird places.
And now you have a skirt like this!

The slit in my skirt was where the bottom of the sweater's armpit started. You don't have to do it this way, I just wanted the skirt to be longer.

The next sweater wasn't as involved as the previous one because it was a smaller size (Medium)
This sweater fit my waist well as it was, there was no trimming and cutting along the sides or the waist. After I cut apart the shoulders, I measured the length I wanted my skirt, serged it, and hemmed it with my sewing machine. (This fabric wasn't as stretchy and textured as the previous sweater was, so it was relatively easy to hem with the machine, carefully.)

I also added slits to this skirt as well (to get more length). But, I hemmed the slits by hand after I serged the fabric, because I didn't think I could hem without stretching the fabric while maneuvering it through the sewing machine at those angles.

And this is the finished product.


I find that when you can't figure out how to pose for a picture, it's best to cover your eyes! ;)

I have to tell you guys, this was such a fun series to create! Although I don't do it as often as I would like, I love to up-cycle clothing. All of the projects in this series were relatively easy. I would definitely not consider myself to be a seamstress...I have a hard time sewing in a straight line! But I do have a sewing machine, and I know how to work it...or at least how to look something up in the manual and follow the instructions. So if I can do these, so can you! Don't be intimidated. Try them and show me what you got. Go and do one right now!!

Liked the post? Let me notify you of new posts. Don't worry, I hate SPAM and won't abuse your email address. :)
Candace Creations